

On the money
With the waiting finally over, Mark van den Boogaart puts our one-off to work
I was eagerly anticipating the arrival of the SSAA/Beretta rifle and while they say all good things come to those who wait, that wait was starting to test the limits of my good nature. With me in Brisbane, the rifle down in Melbourne and various COVID-19 restrictions in place I really needed to cool my jets which was easier said than done. But like all good stories the day finally arrived and after receiving a call from On Target Sporting Arms in Brisbane, it was time to lay my hands on the rifle.
On walking in I spotted Michael behind the counter and after exchanging pleasantries he relayed a funny story. It seems Beretta had sent the gun in a Stoeger air rifle-branded gun bag and on opening it to begin the necessary paperwork he was surprised and immediately impressed by the new ‘air rifle’. Over the course of the next half hour I fielded lots of questions from Michael and the rest of the On Target team about the rifle and gave them the story of its development.
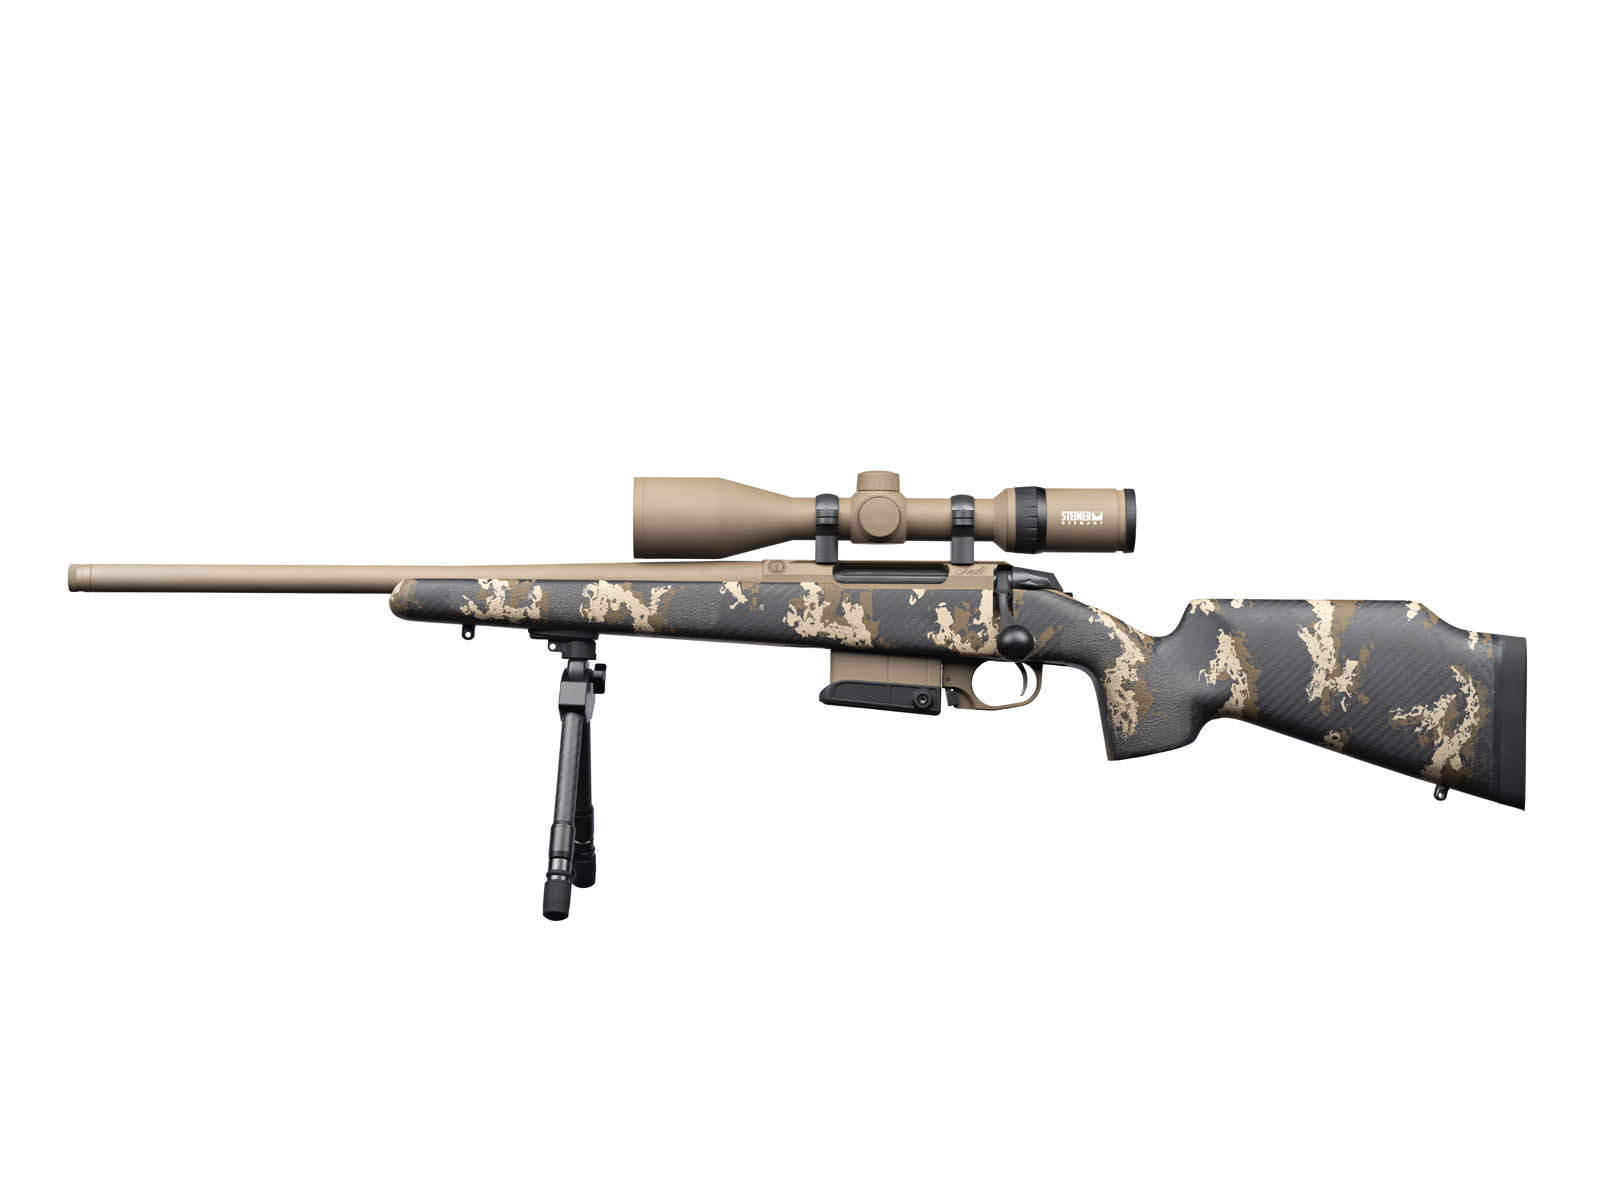
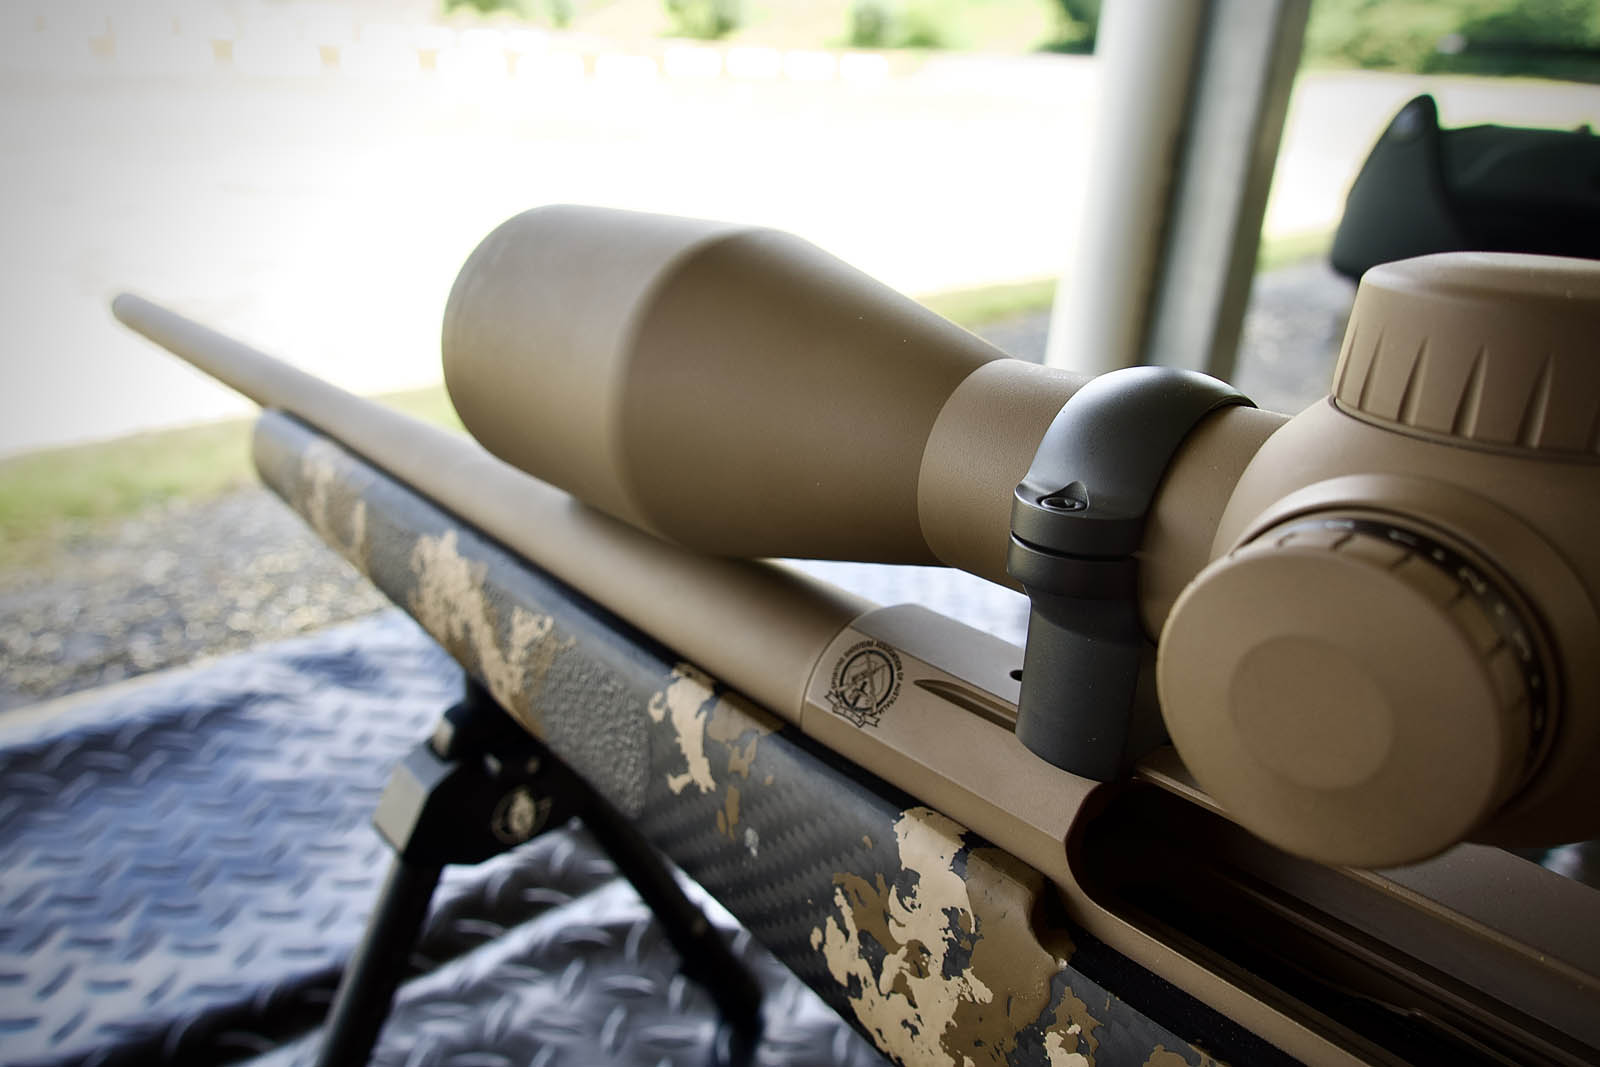
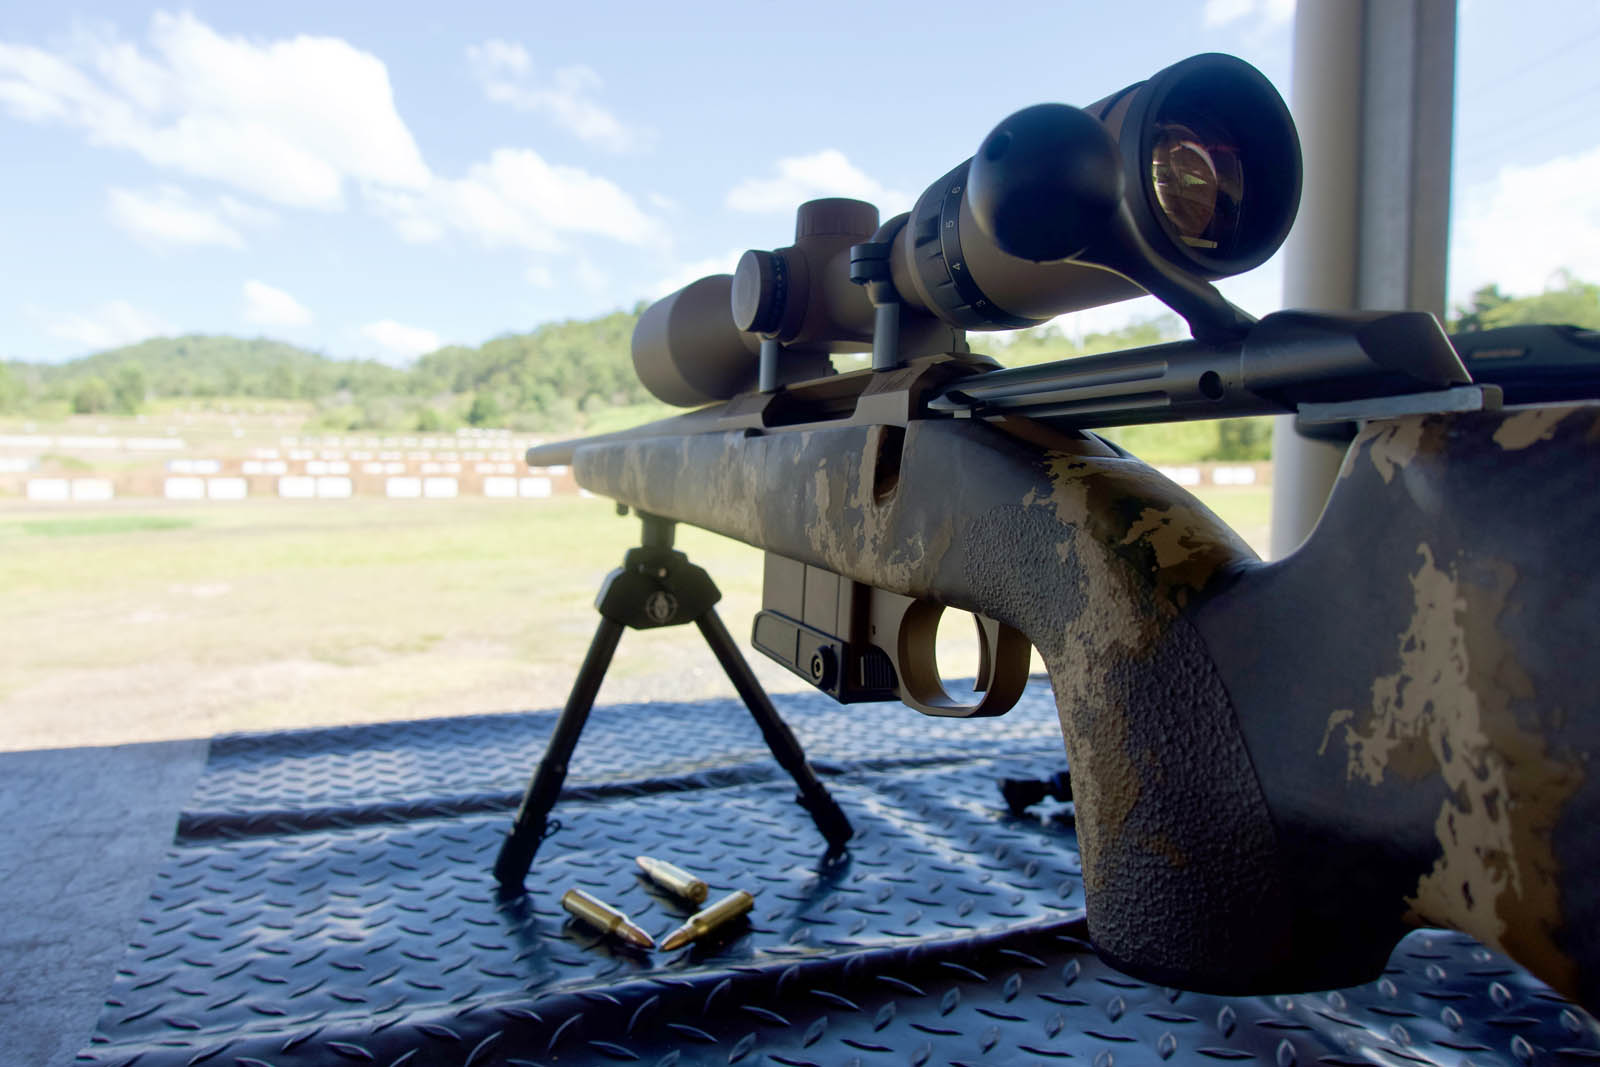
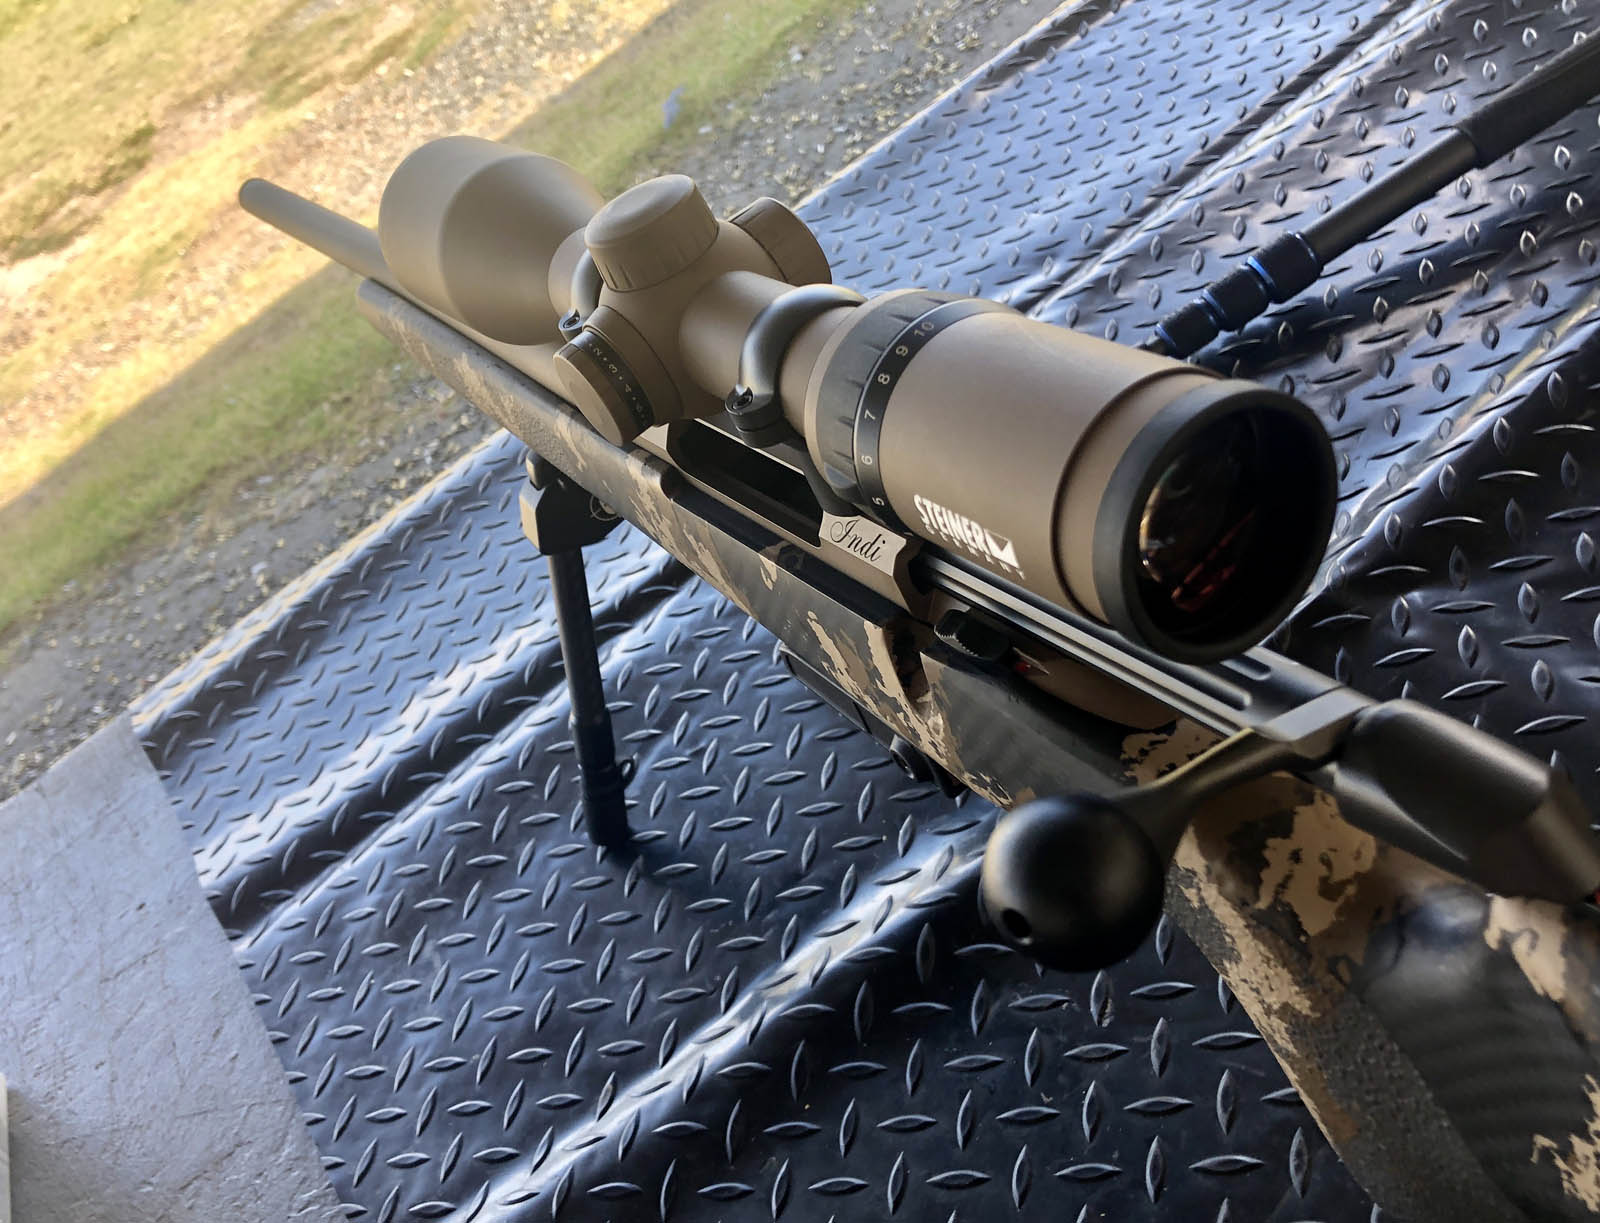
Finally having my own chance to take a good look at it, the first thing I realised was colour selection was spot-on. I prefer a more traditional finish and the application of Cerakote Flat Dark Earth (FDE) and Cerakote Smoke combined with the uniquely patterned Mesa Monte Carlo-styled stock gave the rifle a real compact and business-like appearance.
To recap my previous article on the build, here’s where we’re at:
- Tikka T3x Compact Tactical Rifle (left-hand) in .308 Win;
- Mesa brand, Tikka Altitude stock in Mohave pattern;
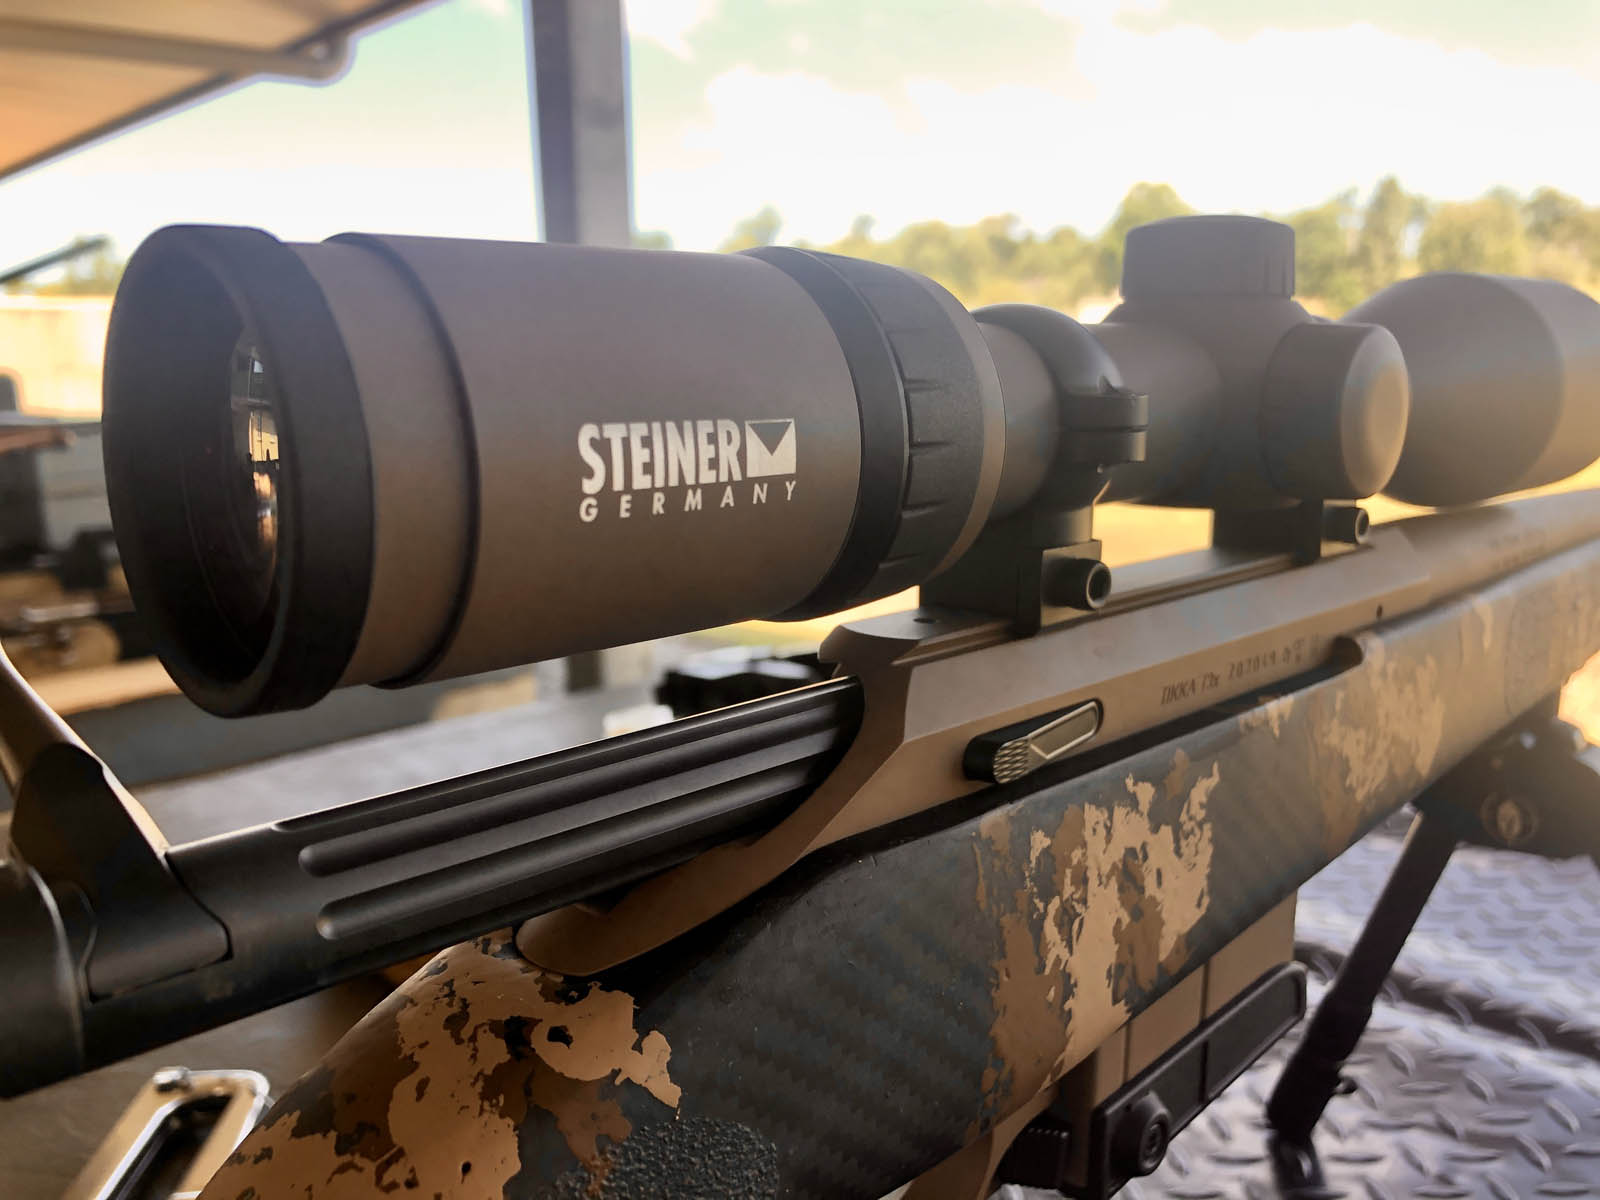
- Steiner Nighthunter Xtreme in 2-10x50mm;
- Burris low-profile hunting-style rings;
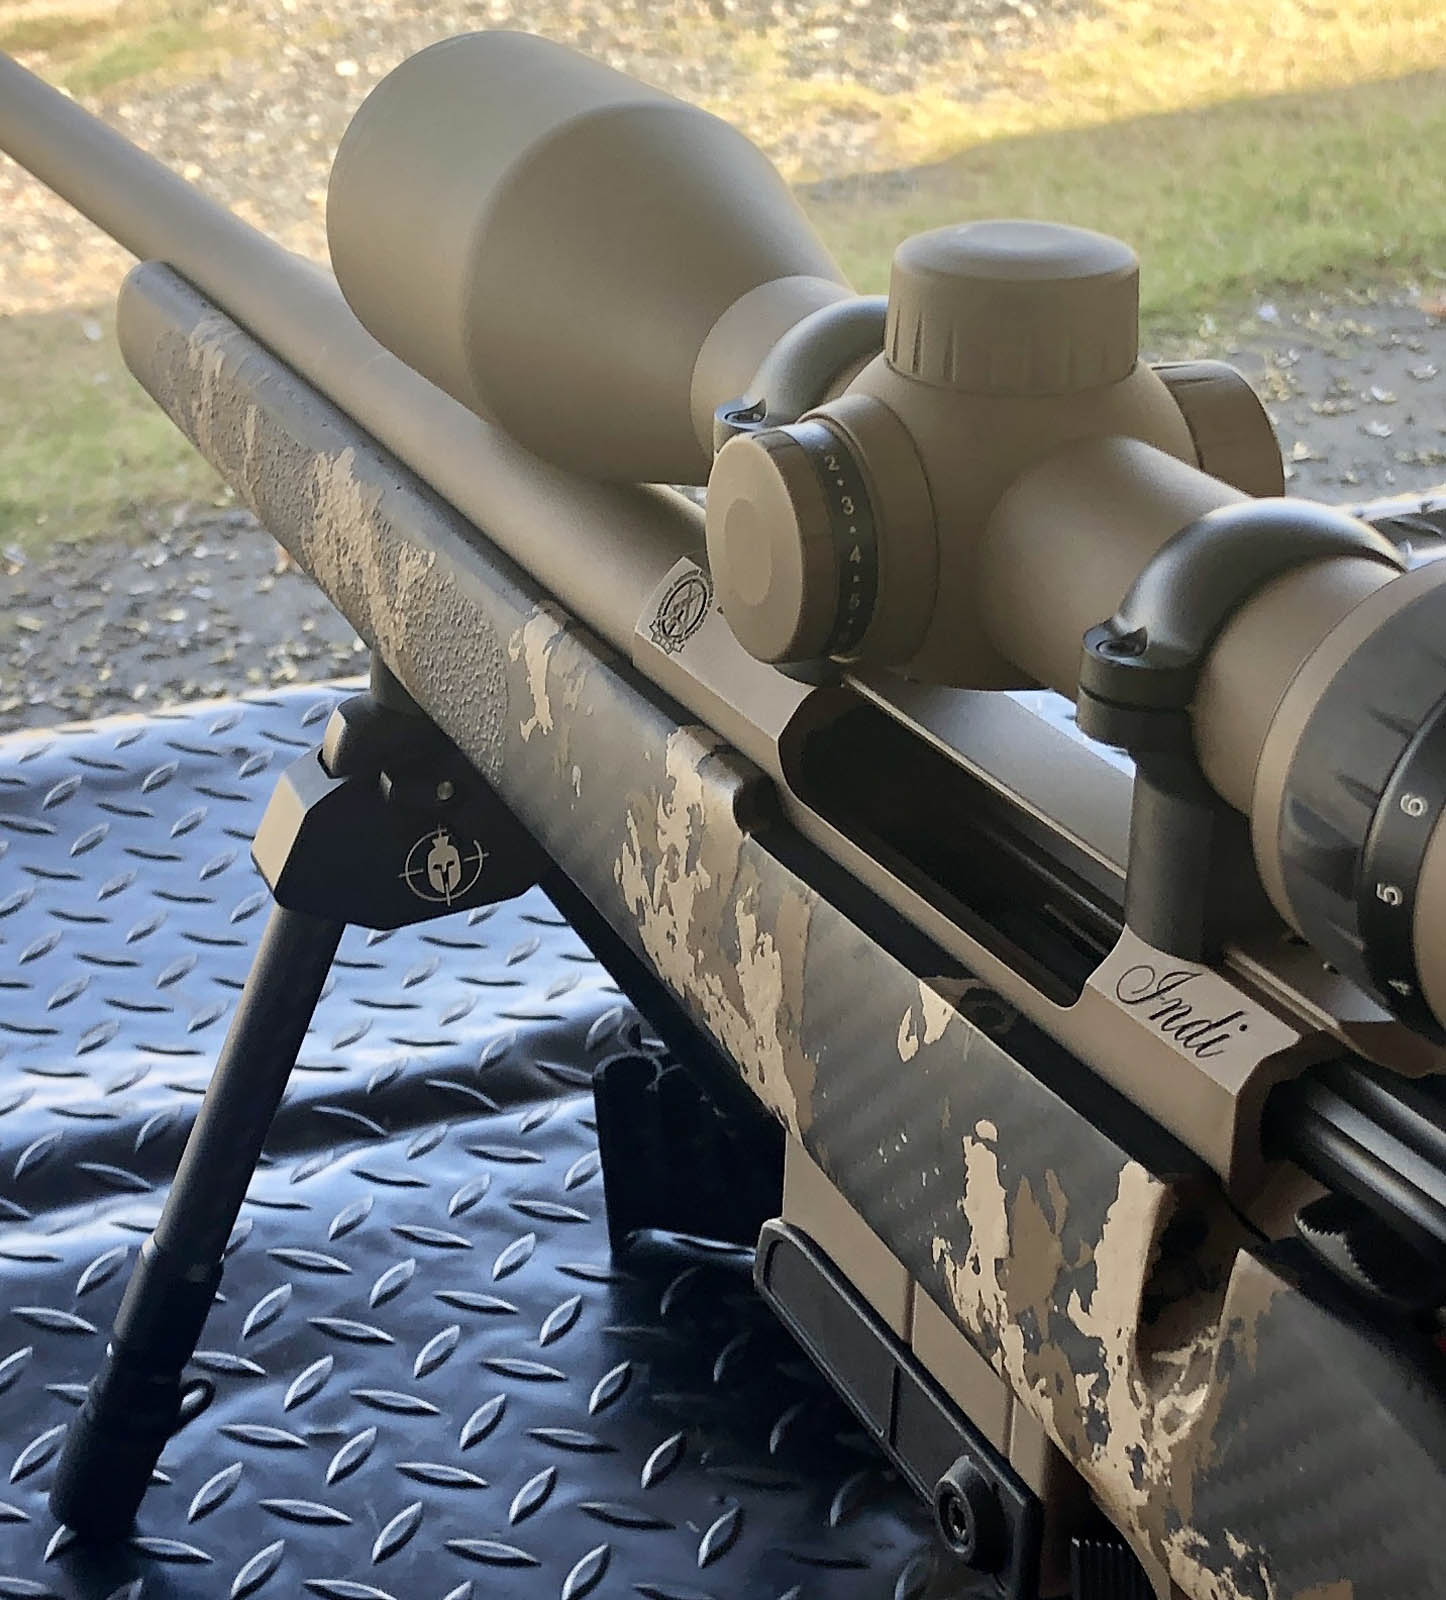
- Spartan bipod with stock-fitted connection point;
- Fluted rifle bolt;
- Fully colour-coded with a combination of Cerakote FDE (Flat Dark Earth) and Cerakote Smoke;
- Fully sourced, assembled and test-fired by Beretta Australia gunsmithing services.
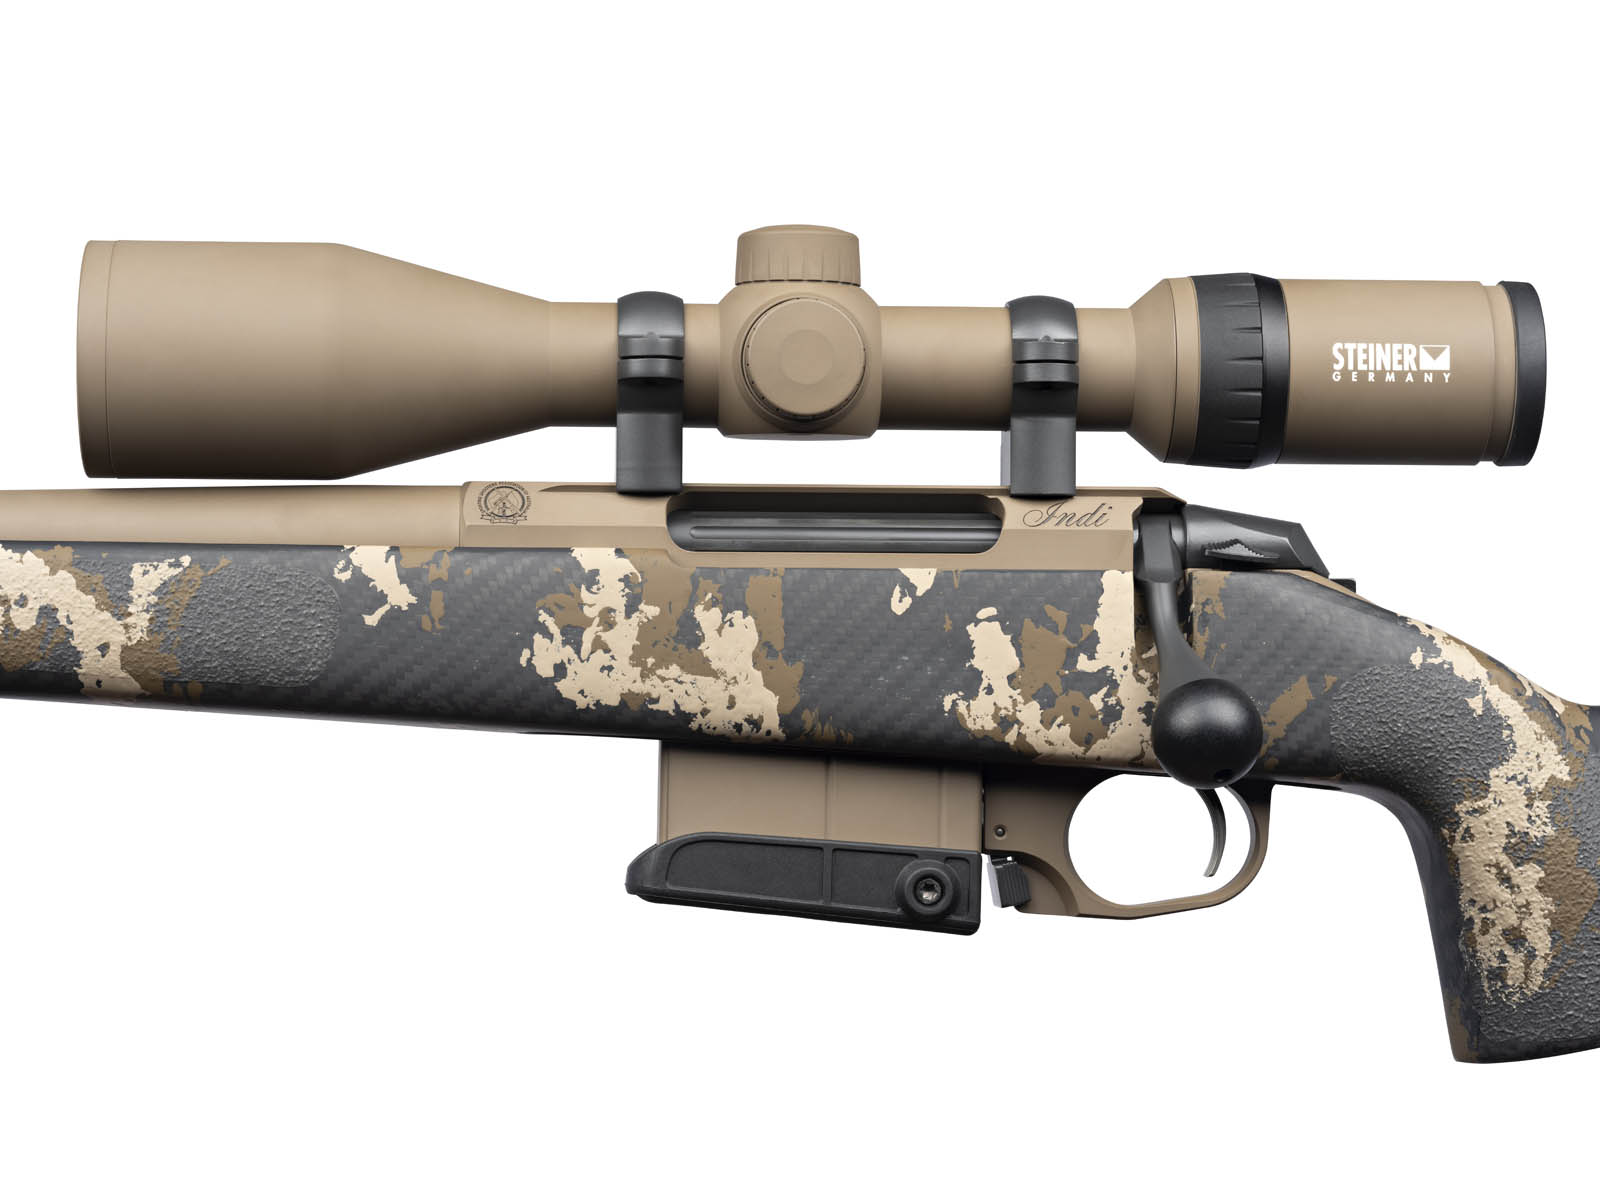
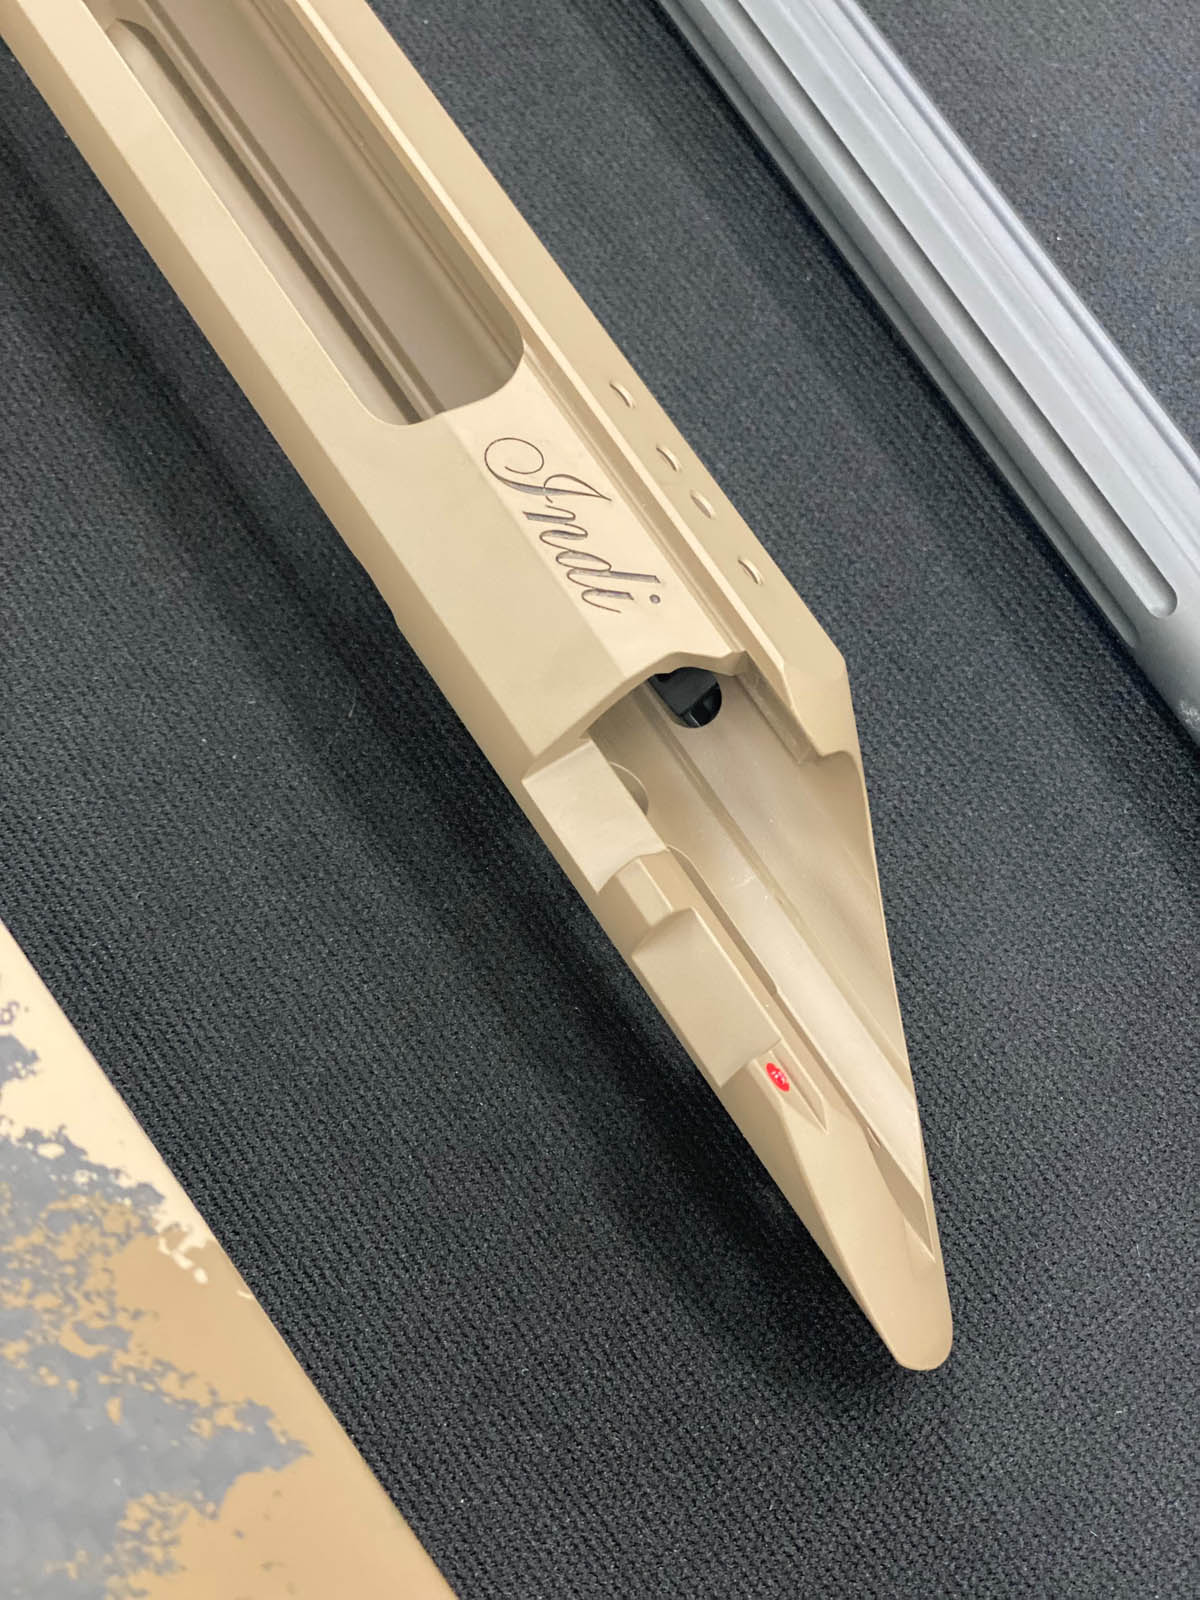
Interestingly, what was really grabbing everyone’s attention were some of the smaller details including the visible Steiner logo on the Cerakoted scope and engraving on the receiver. The logo transfer was the work of Beretta’s Cerakoting specialist and really adds something to the build, giving the scope a factory look like it’s meant to be that colour.
As for engraving, the rifle sports the SSAA shield logo on the front or barrel end of the receiver, about the size of a five-cent piece, highly detailed and representing the Association’s involvement in turning this idea into reality. On the rear or bolt end of the receiver is the word indi in cursive text. Why indi? Well that’s a little complicated as it holds multiple meanings. Firstly, indi reflects the idea of independence as I was and continue to be a little surprised at how much autonomy, or independence, I was afforded throughout this process. The question was always: ‘What do you want, what do you think’, rather than pick from a list and that level of independence gave me a sense of creative licence along with a few nerves! I was heading-up the design so I better get this right. The second meaning reflects the individuality of this rifle as it’s a true one-off.
The third is more personal. As a boy I enjoyed the stories of Horatio Hornblower by C.S. Forester and later the TV series, the books focussing on the adventures of Horatio in and around the time of the Napoleonic wars. Part of his journey from midshipman to eventually Admiral, Lord and hero of the Empire is spent aboard HMS Indefatigable, a real ship commissioned in 1794 which saw plenty of action. Indefatigable is untiring, unyielding, incapable of being fatigued which I thought would be a great motto and name for this rifle.
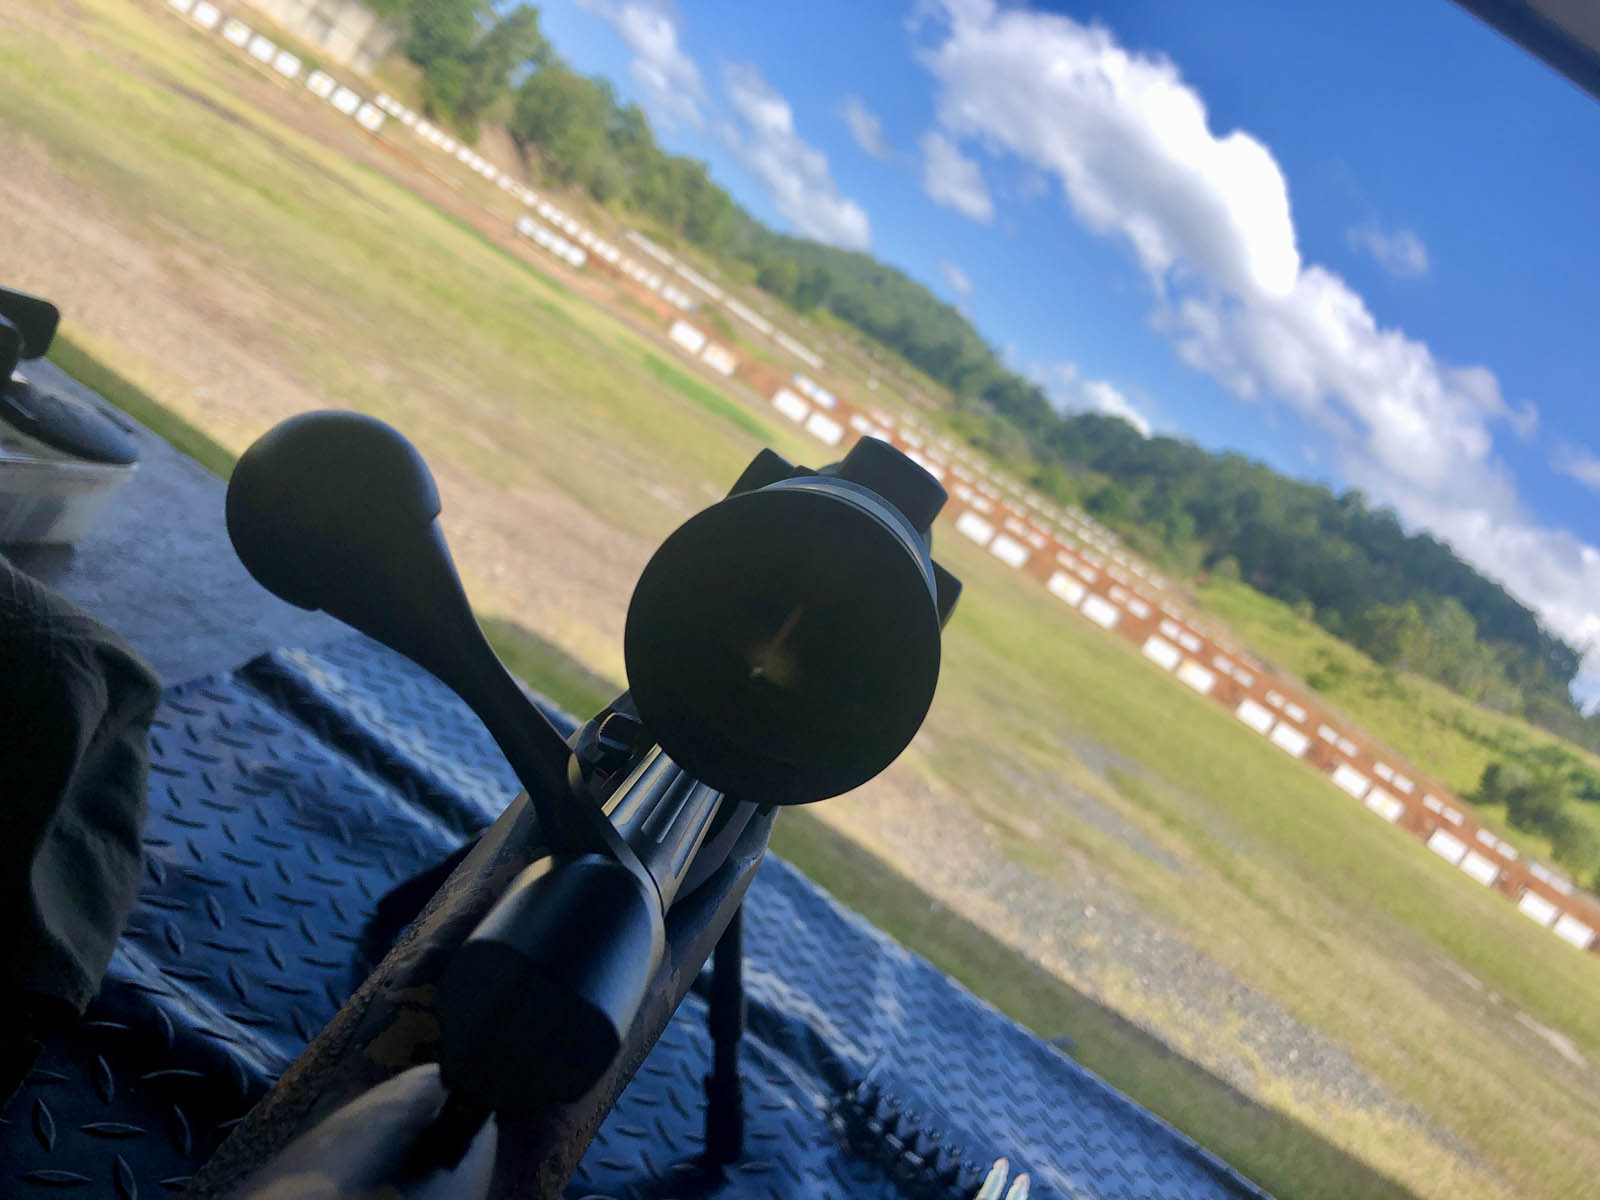
Now looks are one thing but performance is the real test, so it was time to take it to the range. Booking time at SSAA Belmont I headed over one weekday afternoon to sight in the rifle and, on setting it up on the bench, the gun immediately caught the eye of the Range Officer and nearby shooters. Keen to know the details I filled them in on the project and, when the range opened for firing, I went to work.
For testing and sighting I used the Spartan bipod as a front rest with standard beanbag rest for the buttstock. COVID and subsequent changes to range equipment hire meant I now own a Rock Benchrest (see Australian Shooter, July 2021 for review) but as the rifle had a detachable bipod I decided to use that. Now the Spartan bipod isn’t as stable as a heavy, purpose-built rest but was up to the task and certainly made my range box a little lighter.
My ammunition of choice was Sako Gamehead in 150-grain soft-points. Sako Gamehead is reasonably priced hunting-grade ammo and 150gr a standard weight for .308 Win, my thinking behind ammo selection being two-fold. The first is that soft-point 150gr .308 Win ammo is available just about everywhere, so a utilitarian rifle built for Australian hunting conditions should shoot well with it. The second was if it performed well with standard ammo then we had a great platform to continue to improve.
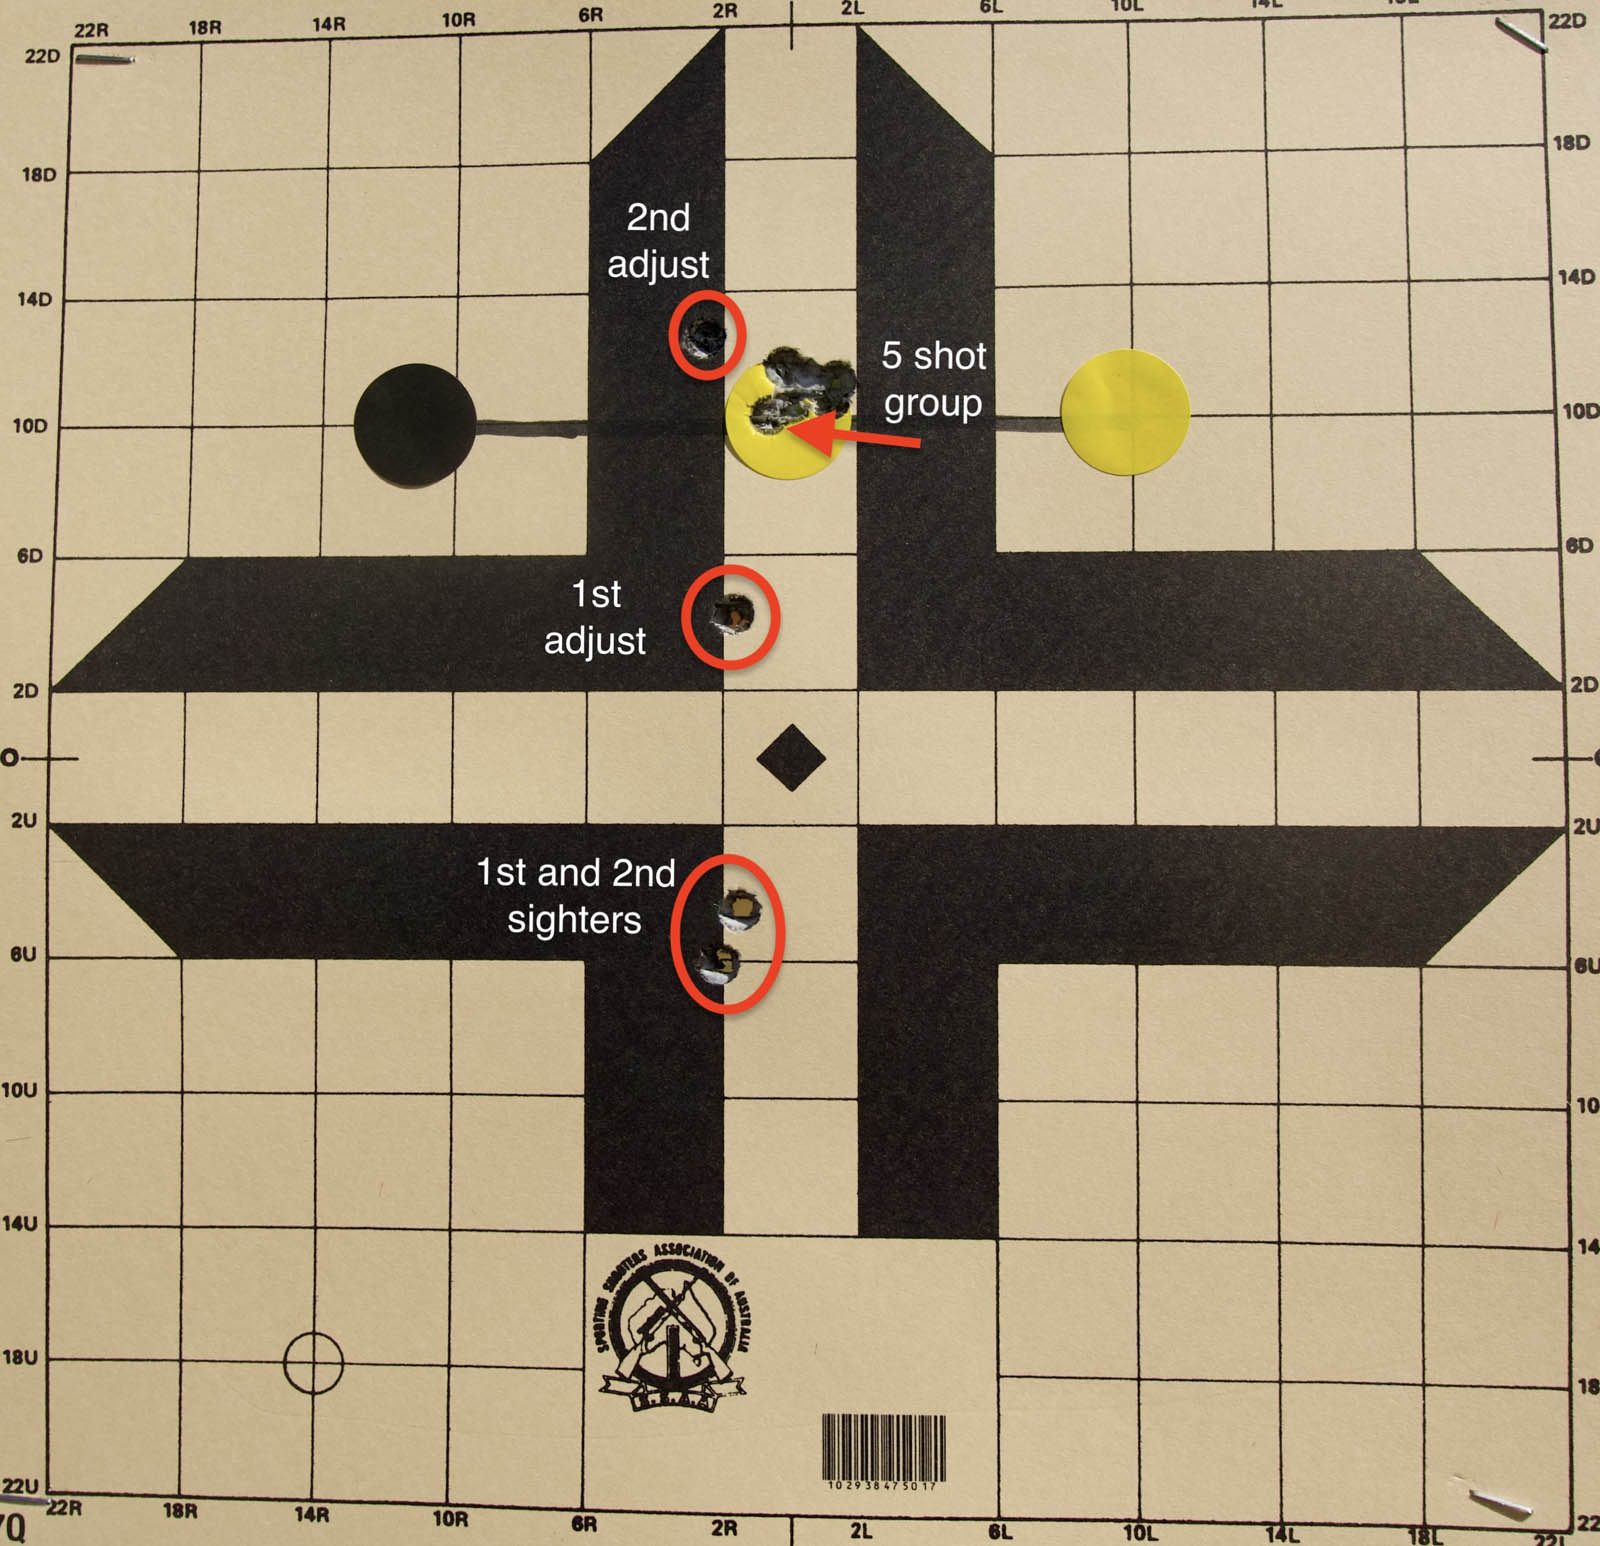
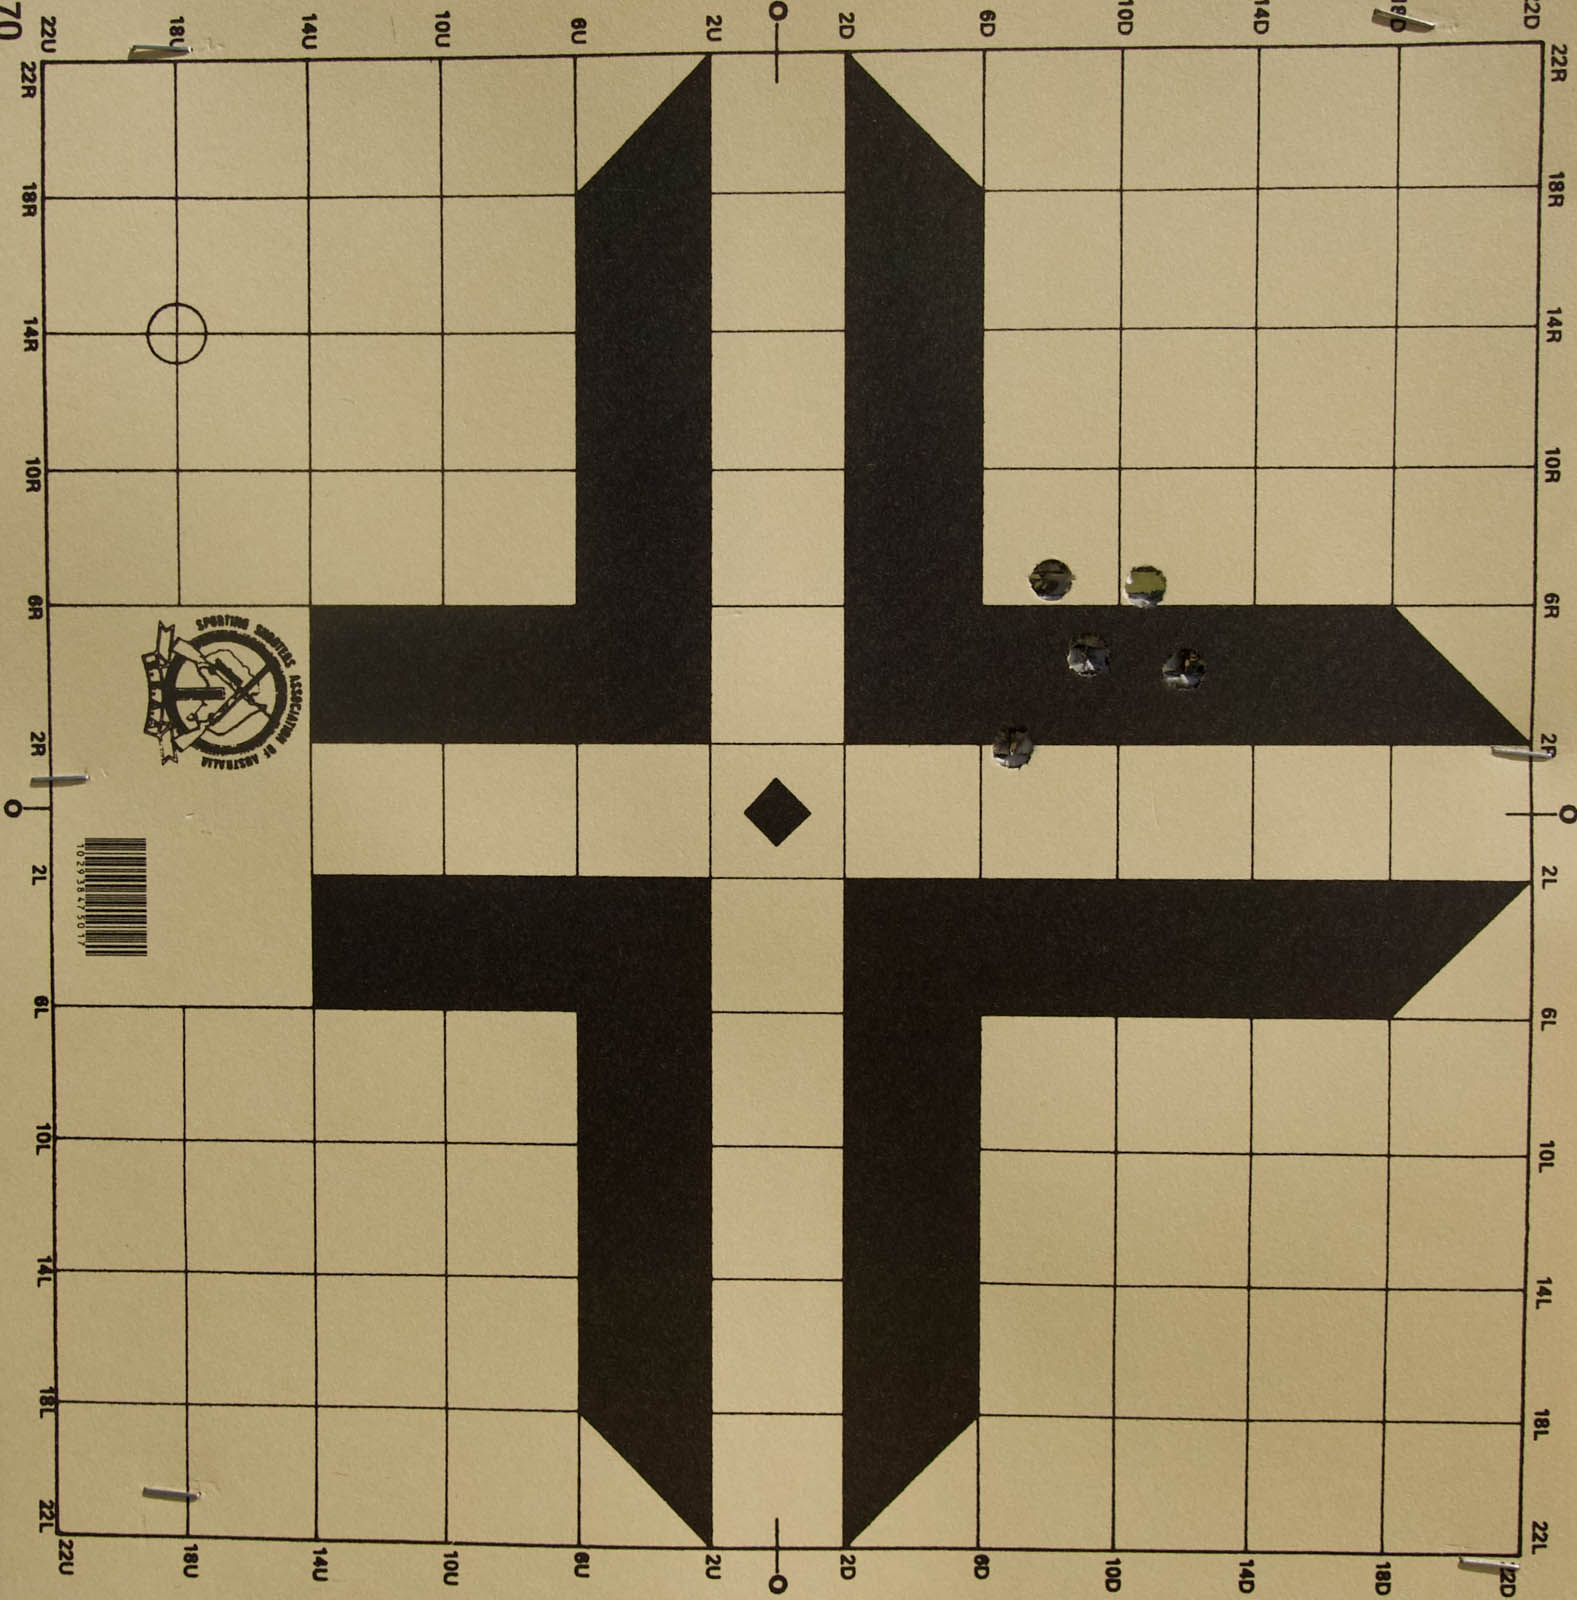
When it comes to sighting-in a rifle I’ve never been one of those guys who can do it in a few shots, I usually need 20 rounds to be comfortable and sometimes more, so I took a few boxes. Luckily, Byron at Beretta Australia had test-fired the rifle so once I had the focus right and set the illumination, I fired my first shot at a 100-yard target and was immediately on paper. Just to make sure I didn’t fluke it, I followed that up with a second and was happy with the result (taken as a pair the sighters were about 12mm left and 25mm below dead centre).
I hunt medium to large game and like to sight-in my hunting rifles using the Maximum Point-Blank Range (MPBR) approach. If you’re unfamiliar with that method MPBR is the furthest distance you can zero your rifle for, at which your bullet is never above or below your line of sight by more than a certain amount. For me that amount is 75mm (3” up) and 75mm (3” down).
To achieve this I sight-in my rifle at 2.5” or 63mm high at 100 yards which in turn makes the shot 1.5” or 38mm high at 200 yards and will reach MPBR of 75mm below at around 280 yards. What this all means is that once set, I don’t need to touch the elevation turret again so I can comfortably hunt out to 280-300 yards. Of course MPBR is influenced by projectile dynamics so this is my set-up for soft-point style loads.
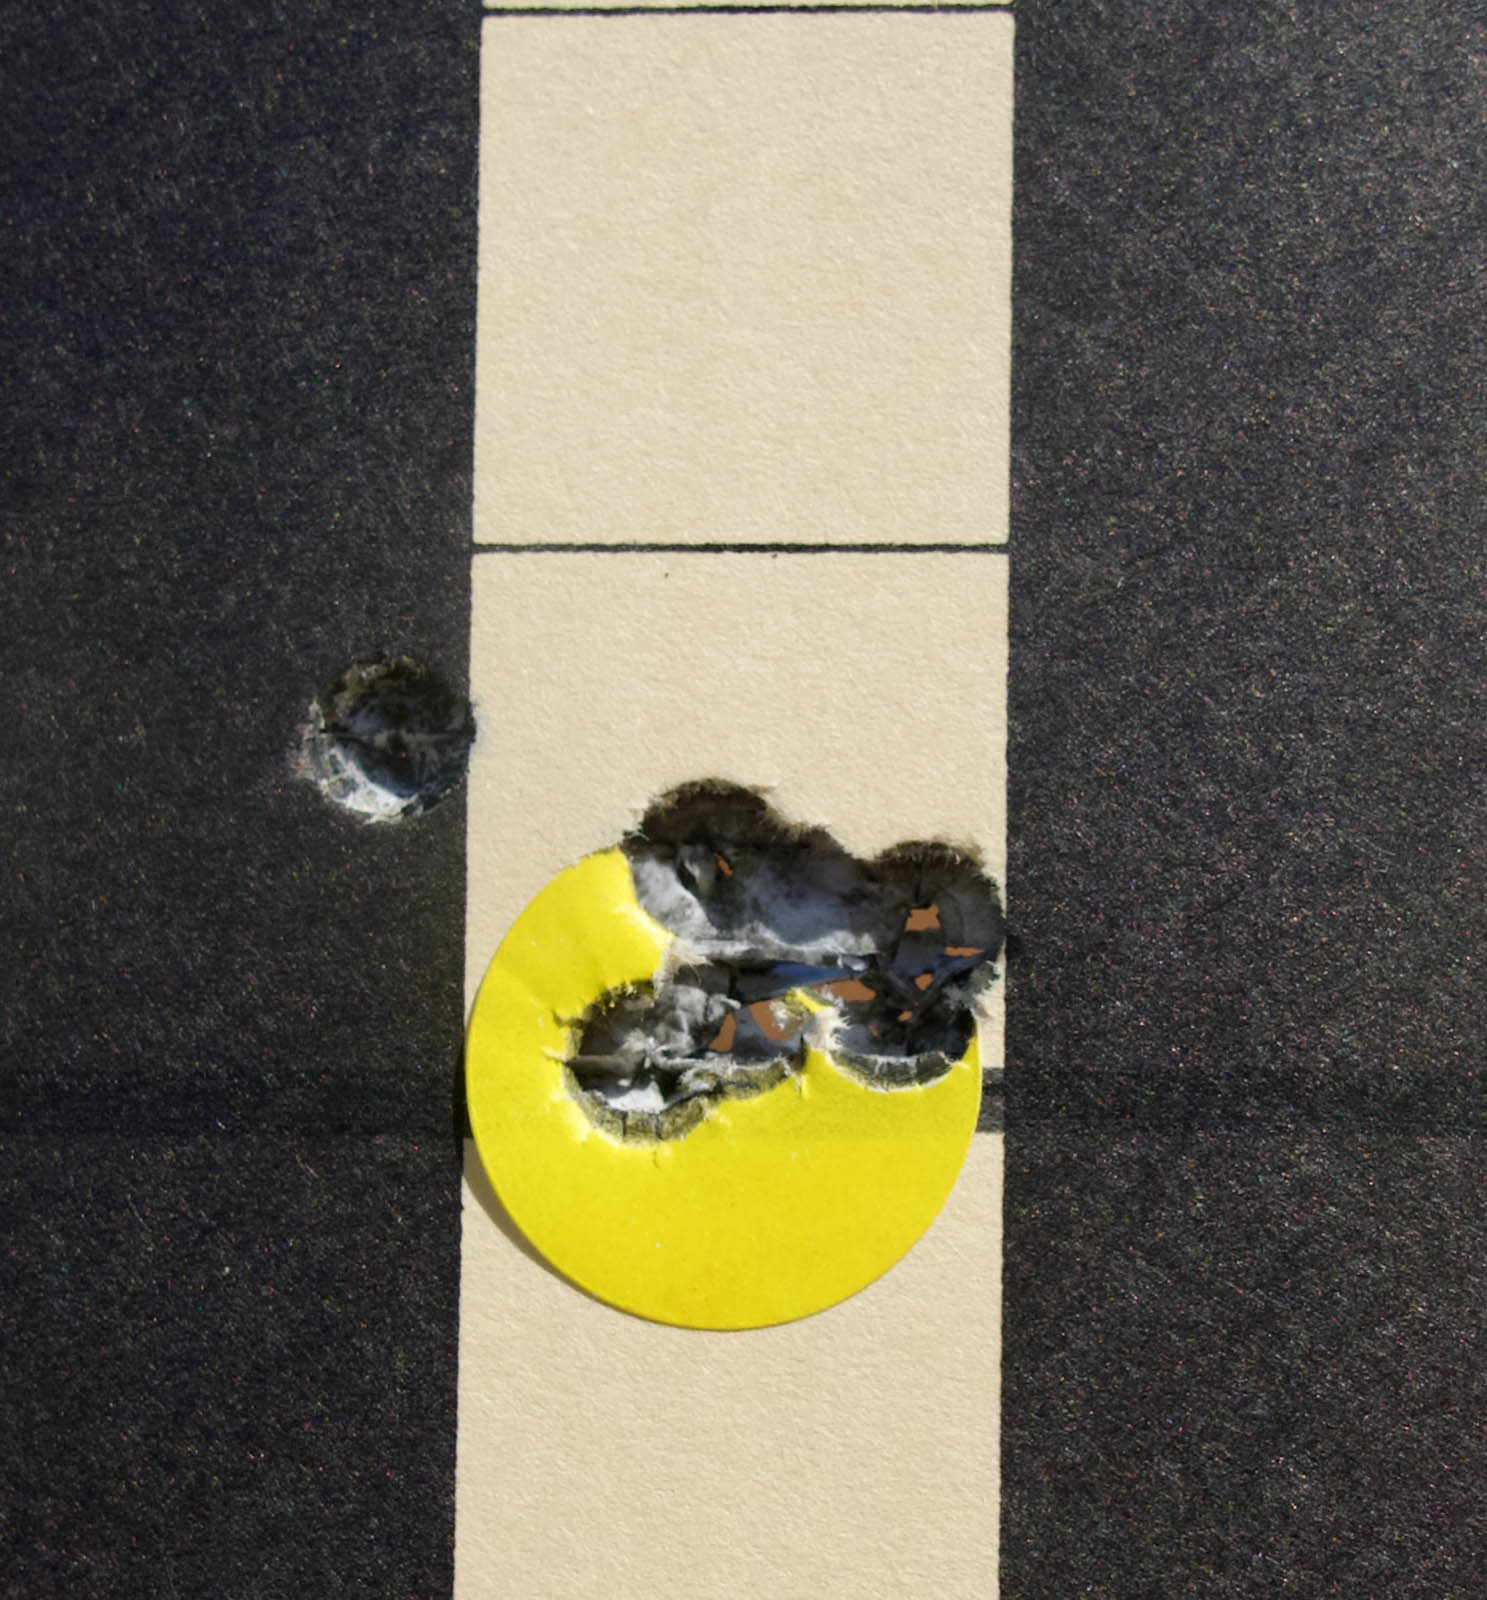
Considering the sighters I made a quick adjustment to the elevation turret and fired another shot. This time I was about 50mm directly above the sighters and with another adjustment was around 20mm above the dark line I’d marked on the target before firing, so I decided to drop the elevation a little and dialled the windage to the right. I then fired five shots the result of which was a group on average about 10mm above the target line. Having reviewed the CTR back in 2018 I knew it was a capable rifle and it seemed the modifications hadn’t adversely affected its inherent accuracy.
After the ceasefire I moved a target out to 200 yards and as the Belmont Range is bayside and the prevailing summer breeze comes from the east, I did take notice of the flags at 200 yards. The first four shots were good in terms of elevation (I dropped the fifth a little) and windage pretty much as expected so with six shots left in the first box, I thought about what to do next.
Luckily to the right was a paper target at 300 yards and on being given the all-clear I moved to the corresponding bench and lined up at that distance, the result an estimated 100mm group of six shots at about 125mm below point of aim (sadly I wasn’t allowed to go out and retrieve the target). All and all the rifle was shooting as good as it looked and with another day booked at the range I’d be focusing on fine-tuning and having it ready for the real test – hunting red deer in the Brisbane Valley.