
Essential shotgun patterning
by Dr Matt Draisma
Australian Shooter September 2004
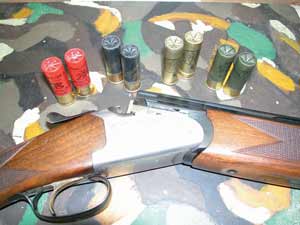
 Checking your shotgun barrels, choke and cartridge performance
In the same way that a well-tuned and zeroed rifle allows you to shoot well with confidence, a properly patterned shotgun will enable you to do likewise, with important animal welfare outcomes. Patterning your shotgun is essential to determine for yourself that it is performing as it should. Some guns produce oval rather than round patterns, which can reduce margins of error in forward or vertical lead allowances. If gun fit is incorrect, the point-of-aim and point of delivery will be at variance. Stocks that are too short will cause you to shoot high and long stocks will tend to shoot low. High combs cause the gun to shoot to the left and/or high, low combs to the right and/or low. A proper length of stock with a high comb is deliberately incorporated in trap guns, which are used on rising targets where the upward (forward) lead would normally obscure the target with the barrel end, and where shooting high automatically provides that extra forward allowance. The comb is made thinner to stop the gun shooting to the left.
Remember that your shotgun has no rear-sight and that this is replaced by your eye position and in turn by the position of your face on the comb of the stock. Patterning your shotgun will help reveal gun fit errors. A shotgun should be fired with both eyes open, with your dominant eye focused on the target, with the shotgun subliminally interposed in the gun-fit-mounted position. Importantly, if you shift your focus to the gun barrel at any time you will miss the target. This is called rifling the shotgun.
The importance of the dominant eye
If you are a right-handed shooter and your left eye is dominant, the gun will impact well to the left of your point-of-aim. To demonstrate this, point your right index finger at an object (if you are right-handed) with both eyes open. Without moving your finger, close your left eye, you should be looking at the point-of-aim along your index finger if your right eye is dominant. Close your right eye and you will see that the non-dominant left eye sees your finger pointed to a position well
to the right of the object. Now point at another object using your right index finger with your right eye closed. Open your right eye and close the left and you can see the problem of the initial scenario. Shot deviations from point-of-aim can also be caused by flinching on firing.
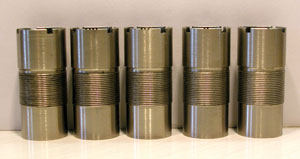
Not only does patterning give information on gun fit, it also teaches you what the chokes on your particular gun actually do. Chokes are constrictions at the end of the barrels that reduce shot spread. They are usually fixed, as an integral part of the barrel at the time of manufacture in many older guns. The owner has a specialised tool for a specialised job and often requires several guns for different purposes. For example, it may be choked for long shots on rabbits and high game-birds and another for short range quail shooting, or even closer skeet targets. More recently built shotguns are supplied with interchangeable choke tubes so that the one gun can perform multiple functions, which is a much more sensible approach. Patterning also demonstrates the density and quality of the shot distribution of your favourite cartridges.
Test firing
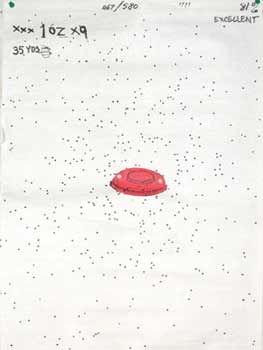
This is usually done standing but using a support such as a ladder after initial free-standing shots to test gun fit. At this stage you are testing the gun and not the shooter. Conventionally, a 30-inch (76cm) diameter circular steel plate is used for patterning, coated with new white wash for each firing from 40 yards. These test targets are available at most shotgun ranges. I prefer to use normal-sized sheets of butcher’s paper of 30x20 inches (78x51cm) pinned to a standard two-post real estate sign, since the sheets can be retained for further study at home. I prefer to use these sheets at 35 yards because of their lack of width. For a reliable assessment of pattern, each cartridge type needs the average results taken from a minimum of five to ten test firings, so patterning can be a tedious process. Testing the cartridge at various chokes and distances is therefore time-consuming but rewarding and well worth the effort.
 Chokes
Chokes are classified by standard terminology to produce a defined amount of constriction at a given range by the manufacturer, the definitions of which will become apparent in the table below. True cylinder should produce a minimal 40 per cent pattern at 40 yards, improved cylinder a minimal 50 per cent pattern, similarly half choke 60 per cent and full choke 70 per cent. I will explain this in detail under pattern density below. Actual choke diameter measurements therefore vary slightly between guns and are ultimately designed to produce similar shot spread patterns at different ranges. In side-by-side guns with double triggers, the most forward trigger operates the right barrel, which usually has the least choke. With single trigger/selector under and overs, the bottom barrel applies. So, if you are using these to take incoming ducks, we shoot the tightest choked barrel first and the more open one second. With going away targets the reverse order of firing applies. A good killing pattern should not exceed
40 inches (112cm) in diameter, so the following table shows the maximum optimum range for the various chokes. Using too dense a pattern at close ranges (from tight chokes) will excessively damage game and dramatically disadvantage the shooter with the inherent reduction in the margin for error. Choke sizes are designated on the chokes or barrels by a series of grooves or stars respectively.
The bold figures and symbols x show the ranges at which each choke designation achieves its optimal pattern spread diameter of 40 inches.
Estimating range
Most shooters overestimate ranges. Prove it to yourself by pacing out 50 yards and placing markers at ten-yard intervals, then go back to the start and take a good look.
Target size diminishes by half, every ten yards and can contribute to the optical illusion for distance. What appears to you as very high birds are often well within the killing range of a shotgun, because the illusion becomes more exaggerated vertically and the scale of the bird deludes your eye into believing it is further away. Using overly tight chokes and overestimating range, results in the shooter missing or passing up many targets that can normally be shot.
The pattern density
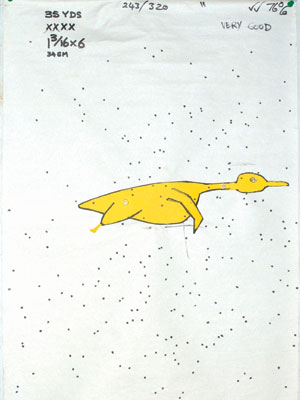
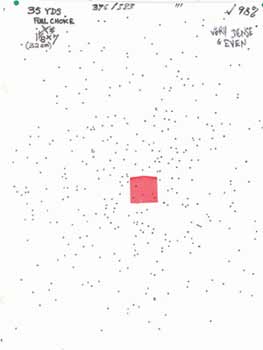
As the shot hits and passes through the test paper, we are afforded a two-dimensional view of the pattern, which is, in fact, three-dimensional. The length of the shot string is not shown, only its width and height, but we know shot string length increases with shot load weights. A one-ounce (28gm) load of shot will have a significantly shorter shot string than a 1.25-ounce (36gm) load, where it can be four-foot long. The latter will actually carry its effective kill pattern out to a longer range than the lighter-weight load irrespective of shot size. Pattern density is controlled also by the choke selection, as already mentioned. The percentage of the shot delivered in the 30-inch circle is one important measure of cartridge and choke performance. A 70 per cent figure, or higher, should be demanded from the modern shotgun cartridge for any given choke at its effective optimal kill distance. Following is a table showing the number of pellets of shot normally found in different weight loads using different shot sizes. This is your starting point. Count the number of pellet marks on you patterning board or the number of holes in the sheet of butcher’s paper, divide it by the total number of pellets in the load of whatever shot size you are using (from this table) and multiply the result by 100 to obtain the percentage. Shot density is obviously affected by shot size, as can be seen. This is a major factor in shot size selection for different sized game. A lethal hit reliably requires at least several pellets to strike the target at the range it is shot, which in turn depends on your choke selection. Your pattern can be overlaid on any part of the central ten-inches with a naked (plucked) silhouette of the intended game, and by drawing its outline on the pattern, the number of pellet strikes can be counted.
Hence number six-shot in 34 grams and modified improved cylinder choking at 35 yards produces a reliable pattern as seen. Quail also therefore require smaller shot (number nine) in a 28-gram load for a denser pattern at 35 metres for a reliable broadside hit, but a going away bird can still fly through the pattern unharmed at this range. Quail are usually shot at 20 yards at which range this pattern will be much tighter from the same barrel and choking.
Pattern quality
There are a number of variables operating here. Velocity, chamber pressures, rates of acceleration during ignition and shock absorbing capacity of the plastic wads are important factors. Modern shotgun ammunition deals favourably with all these variables, compared with the old felt wad paper cases with the roll crimps.
I found that my shotgun gave the best quality patterns at muzzle velocities of between 1200 and 1250fps for the Mulwex powders that I use with Winchester components. The reduced recoil they produced, compared with some of the factory loads, was quite welcome. Fast cartridges in my gun produced erratic shot distribution as well as a hefty boot using Winchester lead shot.
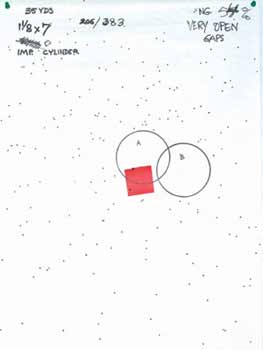
Each shotgun will vary in this respect. Shot roundness and hardness also is a factor, as deformed pellets tend to spread more and too many deformed fliers can significantly erode pattern quality. A good quality pattern is evenly spaced in its central strike zone. Poor quality patterns will show gaps and pellet concentrations on the patterning board. You are in trouble when the size of these gaps matches or exceeds the size of your target because the shot can then fly all around your target without a hit. In other words, your aim was spot on but you missed the target.
With the old felt wads, wad pressure during the loading process was also a very critical factor that has been eliminated by the plastic wads in use today. The shot now is also protected in a plastic cup and never actually touches the sides of the barrel and therefore is less prone to deformation during firing. Crimp quality will govern shot release velocity and powder burning rate and hence pattern. Old tired cases have poor crimp quality. Wad and case designs and primer types can also create variations so every load and brand is different and requires patterning to get to know just how it suits your particular gun. Happy patterning, partners.