
Reload the centrefire cartridge
by Technical Advisor Brendan Atkinson
Australian Shooter May 2002

 There are a number of reasons why shooters
choose to reload their own ammunition, not the least of which is the cost
savings that can be achieved.
There are a number of reasons why shooters
choose to reload their own ammunition, not the least of which is the cost
savings that can be achieved.
With the cost of factory loads slowly climbing, the decision to reload empty shells has been an easy one for many. The only exception to this would appear to be the shotgun shooters, who have discovered that there are factory shells that cost just a fraction more than reloaded shells.
One of the main benefits of reloading is that the shooter can tailor ammunition to their particular firearm and, more importantly, to the purpose for which that ammunition is intended. It is not always possible to purchase factory loads for all tasks.
To the real 'accuracy nuts', the benchrest and target shooters, there is no substitute for reloading. No off-the-shelf factory load can approach the sort of accuracy that these people require.
There are reams of material written on the subject of metallic cartridge reloading. Every bullet makers' guide contains the necessary steps. In this article, we will go through the basics of reloading and why and how you do certain things.
A few warnings before we start
Reloading is a safe and rewarding pastime, if basic safety steps are adhered to.
• Never take short cuts and never reload when in a hurry or when distractions are present. This is a task that requires proper concentration to be safely completed.
• Try to set up reloading equipment in an area that is more or less permanent, such as the corner of the shed or a spare room in the house. Presses and other equipment should be bolted down to a firm surface to work at their best and developing a rhythm as to where things are can assist in avoiding mistakes.
• Propellant powders come under certain legal requirements from state to state. Most gunshops should be able to advise on what is required to satisfy the laws in regard to storage requirements and limits.
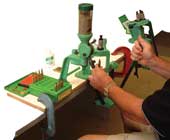
Basic requirements
To successfully reload ammunition, the following items will be required as a minimum:
• Sturdy 'O' frame press
• Set of dies suitable for the calibre (three-die set is preferred)
• Shell holder to suit the case being reloaded
• Case neck deburrer
• Lubricating pad and case lube
• Suitable cases, either fired or new unprimed
• Loading block to put the cases in (or the top of a Redding die box)
• A set of powder scales
• Powder thrower
• Suitable powder, primers and propellant
• A bullet puller, either inertia or pliers type (for when and if you get it wrong)
Some may argue that a powder thrower is not a basic item, but if you ever have to weigh out more than 100 charges before an extended hunting trip, your view may change.
Making basic ammunition - cases and priming
Before we start, we need to understand what happens when a cartridge is fired. The primer ignites the powder, which burns and creates great pressure. This drives the bullet down the barrel and on its way. Simple, isn't it? So, when we reload we are merely replacing the consumable parts of the cartridge. It is possible to duplicate factory-loaded performance, certainly as far as velocity is concerned.
Step-by-step
1. The first step in reloading is to thoroughly
examine the fired cases for any cracks in the neck area or other problems.
Do this even with new unfired brass, as I once saw some cases straight
out of the packet that had no flash holes. You can only imagine what might
have happened if they had been primed and fired.
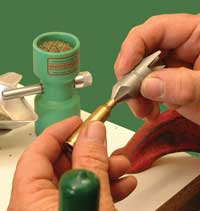
2. Wipe cases clean of any dirt and grit.
3. Remove any powder residue from the necks with some powder solvent on a piece of rough cloth. For really stubborn residue, fine steel wool may be used, but go easy, as you don't want to remove brass as well. Cleaning the cases saves wear and tear on the dies, as once they are scratched they will put marks on your brass forever more.
4. Case necks should be lightly lubricated inside and out with a dry type lube to prevent polluting the powder later.
5. Secure the press to a workbench.
6. Position the neck sizing die just a few turns into the thread.
7. Raise the ram with the shell holder in place.
8. Screw the die down until it just makes contact.
9. Wind it back one half turn.
10. Tighten the lock ring. The decapping pin, which incorporates the expander plug, should protrude from the die about one-eighth of an inch. Its job is to push out the fired primer, but if it is set too long, the thicker part of the rod will 'bottom' on the inside of the case and may be bent or broken. While the decapping was going on, the neck of the case was being sized up at the other end.
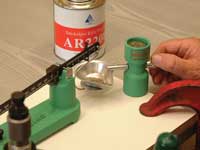
11. Insert a primer into the priming arm. When the ram is lowered, the case is reprimed. Clever stuff, but be gentle as you seat the primer; you don't want to crush it. For advanced reloaders, a separate priming tool is recommended, as more 'feel' can be obtained.
I recommend using only a neck sizing die when reloading, as the cases have been nicely fire-formed to the shape of your firearm's chamber. A full length sizing die (FLS) should only be used when the cases are becoming tight in the chamber - this will be indicated by a heavy bolt lift and/or closure. If the cases were fired in another rifle, they should be full length resized before using. Too frequent use of an FLS can cause weakening of the case wall due to excessive headspace being created. It is most important to lubricate the cases by rolling them on a lube pad before using an FLS die. Failure to do this may result in a case sticking in the die - and they are not easy to remove.
With the cases resized, it is a good idea to give the case mouths a light deburring, inside and out, with the correct tool for the job. Do it after sizing, as the case mouths will be nice and round and will clean up well. This procedure removes any minor lumps and bumps that may have occurred and provides a bevelled edge for the bullet's entry into the case neck.
Powder and bullet
At this stage, we have some nice rows of primed cases, all ready to receive a measured powder charge and then a bullet.
1. Consult any of the good reloading manuals for a suitable powder for the cartridge. It is recommended that you should use a charge that almost fills the case, but don't start with the maximum charge listed in the book. That can be tried later as part of the load development procedure.
2. Set up and zero your scales, as they will be needed to verify the charge thrown by the powder measure.
3. Adjust the measure until the required amount of powder is being delivered at each movement of the charge lever. After a while, you will develop a technique for working the lever up and down and surprisingly accurate charges can be thrown. Varying the lever movement can cause a variation in the amount of powder delivered. It is still a good idea to check the weight every tenth load to ensure uniformity. Powder should be thrown straight from measure to case where possible.
4. After all cases have been charged, ensure that no cases have been missed. The best way to do this is to hold the loading block so that the light can shine in. If a fairly full charge is being used, any powderless cases will become immediately obvious. Don't think it can't happen to you. Some of the top target shooters in the country have gone to the line with powderless ammunition. It can really spoil your day.
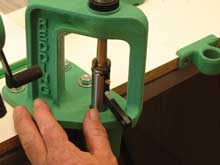
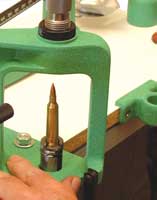
 Setting up the bullet seating die
1. Raise the ram.
2. Screw the seating die down until contact is made.
3. Back the die off about three-quarters of one turn and lock it up.
4. Adjust the bullet depth seating screw back out as far as it will go.
5. Now take a factory loaded round and place it in the ram.
6. Raise the ram until the round is sitting in the die.
7. By adjusting the depth screw down until it just contacts the bullet, you can seat bullets at the factory setting. As a different brand of bullet may be being used, it would pay to seat one and test it for length in the magazine of the rifle to ensure that it will fit and feed. If no factory load is available, seat a bullet so that it will operate through the magazine successfully.
8. When the round is chambered in a safe area, check to see that that there are no rifling marks on the bullet.
9. If everything appears okay, then load the rest of the cases.
10. Wipe off any surplus lubrication and then put the completed bullets into a clearly marked container ready for use. You should always label reloads with the date made and what 'recipe' was used on that particular batch. Trusting loads to memory can create problems.
11. Now is the fun part. Take the firearm and ammunition to the range and see how well they perform, while accurately sighting the rifle in at the same time.
Advanced techniques - a few extra tricks
More experienced reloaders go to great lengths to ensure that the reloads produced are as perfect as possible and that starts right from the beginning.
No factory loads here. Start with brand-new unprimed brass. The flavour of the month is Lapua cases, now available in numerous calibres and considered to be of competition quality.
Weighing new cases may detect some that are slightly out of the normal range. These may be 'culled' out for use as static length rounds for setting up the dies. Forget weighing fired ones, as we don't know how much powder residue may be inside some but not others.
Flash holes should be checked with a flash hole deburring tool, available from many of the manufacturers.
It is pointless to worry about overall length until the case has been fire-formed and resized with the necking die. Most good reloading manuals, such as Reloading for Rifles and Pistols by Barry Wilmot (available through SSAA merchandising), will advise you of the correct length of every case. Use a case trimming tool to duplicate the stated lengths.
For hunting and varmint rifles, neck turning should not be necessary if a standard SAAMI chamber has been used. For tight neck chambers, this will be required but this is going into the area of competition rifles and for this article the focus is on the slightly less serious shooter. This is not to say that some cases may benefit from a very light neck turning to clean up any high spots. Don't take too much metal off; otherwise normal dies may not work with those cases.
Competition-grade dies are made by companies such as Redding and its Competition Neck Die sets have bushings in them that allow for very precise ammunition to be made. These bushings are interchangeable, giving the reloader greater control. Some of the long-range benchrest shooters rely on these dies for reloading some of the more exotic chamberings now becoming more popular. To work out what size neck bushing is needed, measure the neck size of a loaded round using a good precision micrometer. Subtract .003 from this and there you have it. It would pay to buy bushings either side of that, as a change of bullet brand or case manufacturer may cause some variation.
A good powder measure is a necessity and Redding's 3BR represents excellent value for money; it is one of the few powder measures sold over the counter that comes fitted with a powder baffle incorporated into the powder reservoir. This is put there to maintain a constant pressure of powder on top of the charge drum, rather than have the pressure changing as the level of the powder in the reservoir drops during the powder charging procedure. After becoming used to the angle of your lever, it will be possible to throw charges with consistent accuracy. Some powders measure more accurately than others and it is no surprise that ball powders 'throw' particularly well. However, some of the new breeds of ADI powders appear to be a lot finer now and certainly 'throw' well compared to the logs of old, especially in the slower range of burning rates.
Bullet seating for accuracy revolves around lands contact and you must first establish the point at which the bullet just kisses the lands or rifling. This subject is covered in the Benchrest column in this issue. In addition to the method described there, you could use some of the new tools available, such as the Stoney Point Gauge, which will give an accurate picture. Unless you are shooting for competition, do not seat bullets so that they bite into the rifling. If you are hunting with ammunition like this, a round once chambered must be fired before opening the bolt, as the danger of leaving the bullet stuck in the barrel and powder all through the action is too great. Don't do it. Competition-type seating dies are available and have a micrometer incorporated in the top section for very precise and repeatable settings.
Summary
We have only just scratched the surface of reloading in this article. Using the methods described will produce adequate to very good ammunition, depending upon the handloader's diligence. As you become more experienced, there are a number of gadgets that can be purchased to make the task easier and more precise. The choice is limited only by your budget. If you shoot a couple of hundred rounds per year, the cost of the reloading equipment will soon pay for itself. For those of us who shoot thousands of rounds, well, we would not be without it.
Keep it safe. Always exercise caution and when in doubt, leave it out.