
Making a pistol grip
by John Robinson
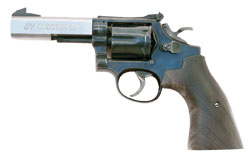 I recently had a Short Barrel match revolver
made up on an S&W Model 14. The end result on the metalwork was to my
satisfaction, but it was fitted with a fairly dodgy set of grips, which
were not part of the custom pistol deal.
I recently had a Short Barrel match revolver
made up on an S&W Model 14. The end result on the metalwork was to my
satisfaction, but it was fitted with a fairly dodgy set of grips, which
were not part of the custom pistol deal.
I have a hang-up with my target handguns in that I do not like grips that have been, for want of a better word, butchered, in the interests of fitting the owner. This was to be no exception.
Rather than buy a set of S&W target grips, which are relatively inexpensive, I elected to make up a custom set of grips that would cover the backstrap of the revolver, which is exposed with standard grips.
I have made handgun grips in the distant past, using various primitive techniques, but this time I decided to take a more measured approach to make the job easier and get a better outcome.
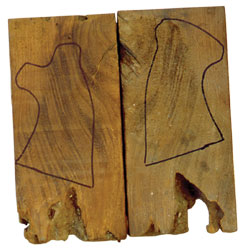
The first challenge was to get some appropriate wood. A friend of mine had some pieces of walnut in his wood collection and let me pick over what was there. The blank sizes need to be about 150mm square and at least 30mm thick, to provide enough latitude to lay out the grip panels to avoid defects or to pick up the best sections of the blank.
 I was limited to a couple of choices and made mistake number one by picking the best-figured pieces that were only barely large enough for the job. One piece had a deep defect at one end and I hoped I could work around it. No such luck, as it turned out.
One thing that influenced my decision was that these particular pieces of walnut had come off the original gun-carriage of a muzzleloading cannon that now resided in a local park, so I figured that recycling them on to another gun was an appropriate destiny.
Revolver grips are a fairly simple pattern and can be easily traced onto the wood. However, I recommend that thin, stiff cardboard be used to cut out templates to match the grip profile and also the inletted sections. This reduces any parallax error in tracing the shape and is much more accurate.
Before marking out the inletting pattern on each grip blank, they should be sanded on a face plate sander to ensure each is dead flat and they fit together without any gaps or lumps. These sections will become the mating parts of the grip panels. If they fit together in the first place, then they will go together at the end.
 It is also important to ensure that the sides of the blanks are parallel, as the inletting operations index off the outer side of the panel.
The blanks can then be profiled to close (about 2-3mm) to the final size; leaving too much wood just means extra work. I used a band-saw for this job; a jigsaw could also be used.
The critical part of any pistol grip job is the inletting. For this I used a small milling machine that worked as an upside-down router. Conventional routers are not suitable, as you cannot see what you are doing. The grip panels were clamped in a drill press vice to fix them in the moveable table.
Another option is to use a drill press set at its highest speed, along with a drill press vice to hold the work on the drill press platform. I purchased a 6mm tungsten carbide router bit (about $15) to fit in the miller collet. The same bit can be fitted to a drill press chuck.
This is about the smallest practical router bit and the double-cut blade also end cuts, giving a smooth finished surface in both directions.
 For anyone interested in grip making, I strongly recommend the purchase of a Dremel tool or something similar. I have had one of these for many years and the high speed hand grinder can get into the detail areas of the inletting. Various very small router bits are available, and while they’re about $20 each, the original Dremel bits are high quality.
The depth of the inletting around the S&W frame is determined by the width of the front and back strap and the step-up to the main part of the frame. These can be measured with a steel toolmaker’s rule to get the exact inletting depth for each area. Logically, the depth around the frame is half the frame width, as each panel has to meet in the middle.
With the router depth set and the panel clamped in the vice, the inletting operation can proceed. The main thing at this point is to take it very slowly. The inletting lines need to be marked in indelible black pen. Pencil lines are hard to see on an angle if the work is under the drill press.
 It took me about four hours to inlet both panels, as it was my first attempt. The adjustable bed on the little milling machine made things easier, as I could control the movement of the wood using the micrometer travel adjustments in each direction.
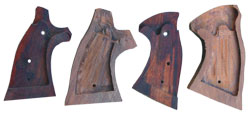
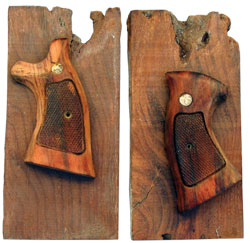
After the main inlet cuts were made, I trimmed the internals in the tight corners using the Dremel and two different router bits, which are shown in the accompanying photos.
I ran into trouble with the panel that had the defect, as the wood broke away during the machining operation, making a less than tidy job of the inletting at the top of the grip panel. Walnut machines very well and the carbide router bit left a clean surface.
The next important stage is to drill a grip screw hole. I used the original grip panels to locate the hole in the correct position so that the screw will not foul the hammer spring.
 With the two inletted panels on the pistol frame, a hole can then be accurately drilled through both panels. I used a cup head bolt with the same shank diameter as the grip screw to hold the grip in place for the next stage of the operation.
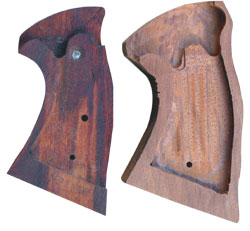
With the blank panel on the frame, I ground the bottom of the grip and the front and rear on a belt sander so that the perimeter of each panel mated exactly. This provides the alignment for the grips when they are off the S&W frame.
The next stage of the operation - removing the excess wood to form the final shape - was done with a 100mm angle grinder fitted with a rubber, Velcro-faced disc. These can be purchased at any major tool or hardware store; simply bolt on in place of the abrasive grinding disc.
I had a batch of pads starting at 40-grit and going down to 320. The 40-grit paper really rips the wood away.
I found the best way to do this with maximum control and safety, was to clamp the grinder between the ‘jaws’ of my adjustable workbench. This frees up both hands and reduces the risk of grinding yourself when holding the grinder in one hand and the grip panel in the other. You cannot put wood back after you remove it, so again, taking your time at this stage will pay off.
 Once you are within 90 per cent of the finished form, it is time to fit the grip screw. I salvaged an original S&W screw and escutcheon nut from another reject set of grips. I used the Dremal to size the hole for the screw head and nut, as it lowers the risk of splintering the wood, which can happen with a twist drill.
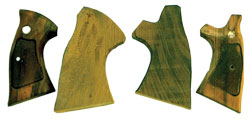
The fun part now comes in putting the final finish on the grip. This is done by finishing the forming with 120-grit paper and then hand-sanding the surface of the grips. At this stage, they should be fitted to the frame to ensure a perfect match between the panels.
The frame can be protected with some strips of black electrical tape in the areas where it may be scratched by the abrasive paper.
After the grip is worked over with 320-grit paper, working only in the direction of the grain, it should be wet with a damp cloth to raise the grain and then be re-sanded. The final stage is to work over the walnut with fine steel wool. This will put a fine finish on the timber and ready it for finishing.
I do not like a shiny varnish finish in firearms. I use my own finishing system that has worked well on both long arms and handguns and produces a durable, non-slippery finish. There are a number of off-the-shelf stock finishes that may work as well for you.
 The total time to make these S&W grips was about eight hours of inexperience. The mistakes I made that are worth avoiding were:
1. Selecting wood blanks that were too small and had defects.
2. Not making accurate cardboard profile and inletting templates before making up the blanks.
3. Not taking enough care in measuring and setting the inletting depth. This meant that several runs on the miller were needed to get to the right depth.
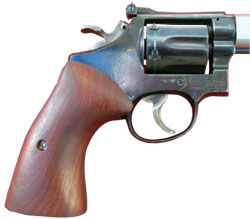
While far from perfect, the end result is a set of grips that are fuller than the standard grips and more comfortable to handle in the match for which the S&W custom revolver was designed. They also enhance the appearance of the outfit.
This exercise has whet my appetite to have a go with another of my pistols, this time using a local Australian timber that will look good, such as Tasmanian Blackwood or myrtle.